82 lines
5.2 KiB
Markdown
82 lines
5.2 KiB
Markdown
TL;DR: set your `Inpainting conditioning mask strength` to half of your `Denoising strength`
|
||
|
||
### Discussion: https://github.com/AUTOMATIC1111/stable-diffusion-webui/discussions/4530
|
||
|
||
# conditioning-highres-fix
|
||
|
||
This is Extension for [AUTOMATIC1111/stable-diffusion-webui](https://github.com/AUTOMATIC1111/stable-diffusion-webui) for rewriting "Inpainting conditioning mask strength" value relative to "Denoising strength" at runtime. This is useful for "Inpainting" models such as `sd-v1-5-inpainting.ckpt`
|
||
|
||
## Installation:
|
||
This extension is included into the official index! Just use `Available → Load from` in WebUI Extensions tab, and seek for `conditioning-highres-fix`
|
||
Or copy the link to this repository into `URL for extension's git repository` on `Install from URL` subtab there:
|
||
```
|
||
https://github.com/klimaleksus/stable-diffusion-webui-conditioning-highres-fix
|
||
```
|
||
Also you may clone/download this repository and put it to `stable-diffusion-webui/extensions` directory.
|
||
|
||
## Usage:
|
||
You will see radiogroup titled `Conditioning Highres.fix strength (for sd-v1-5-inpainting)` on txt2img and img2img tabs.
|
||
|
||
When `Cond.fix: Disabled (none)` is selected – nothing will be done. But otherwise, your `Inpainting conditioning mask strength` will be:
|
||
- `Cond.fix: Empty` = always set to `1.0`, effectively turning off mask strength feature;
|
||
- `Cond.fix: Lowest` = set to `1-Denoising/4`
|
||
- `Cond.fix: Low` = set to `1-Denoising/2`
|
||
- `Cond.fix: Medium` = always set to `0.5`
|
||
- `Cond.fix: High (recommended)` = set to `Denoising/2`
|
||
- `Cond.fix: Highest` = set to `Denoising/4`
|
||
- `Cond.fix: Full` = always set to `0.0`, turning on maximal effect.
|
||
|
||
To use this in txt2img – don't forget to enable `Highres. fix` checkbox and make your dimensions are larger than default 512\*512. Also its better to turn off `Upscale latent space image when doing hires. fix` option in settings, because it often gives blurry results on low conditioning strengths.
|
||
|
||
## Explanation:
|
||
|
||
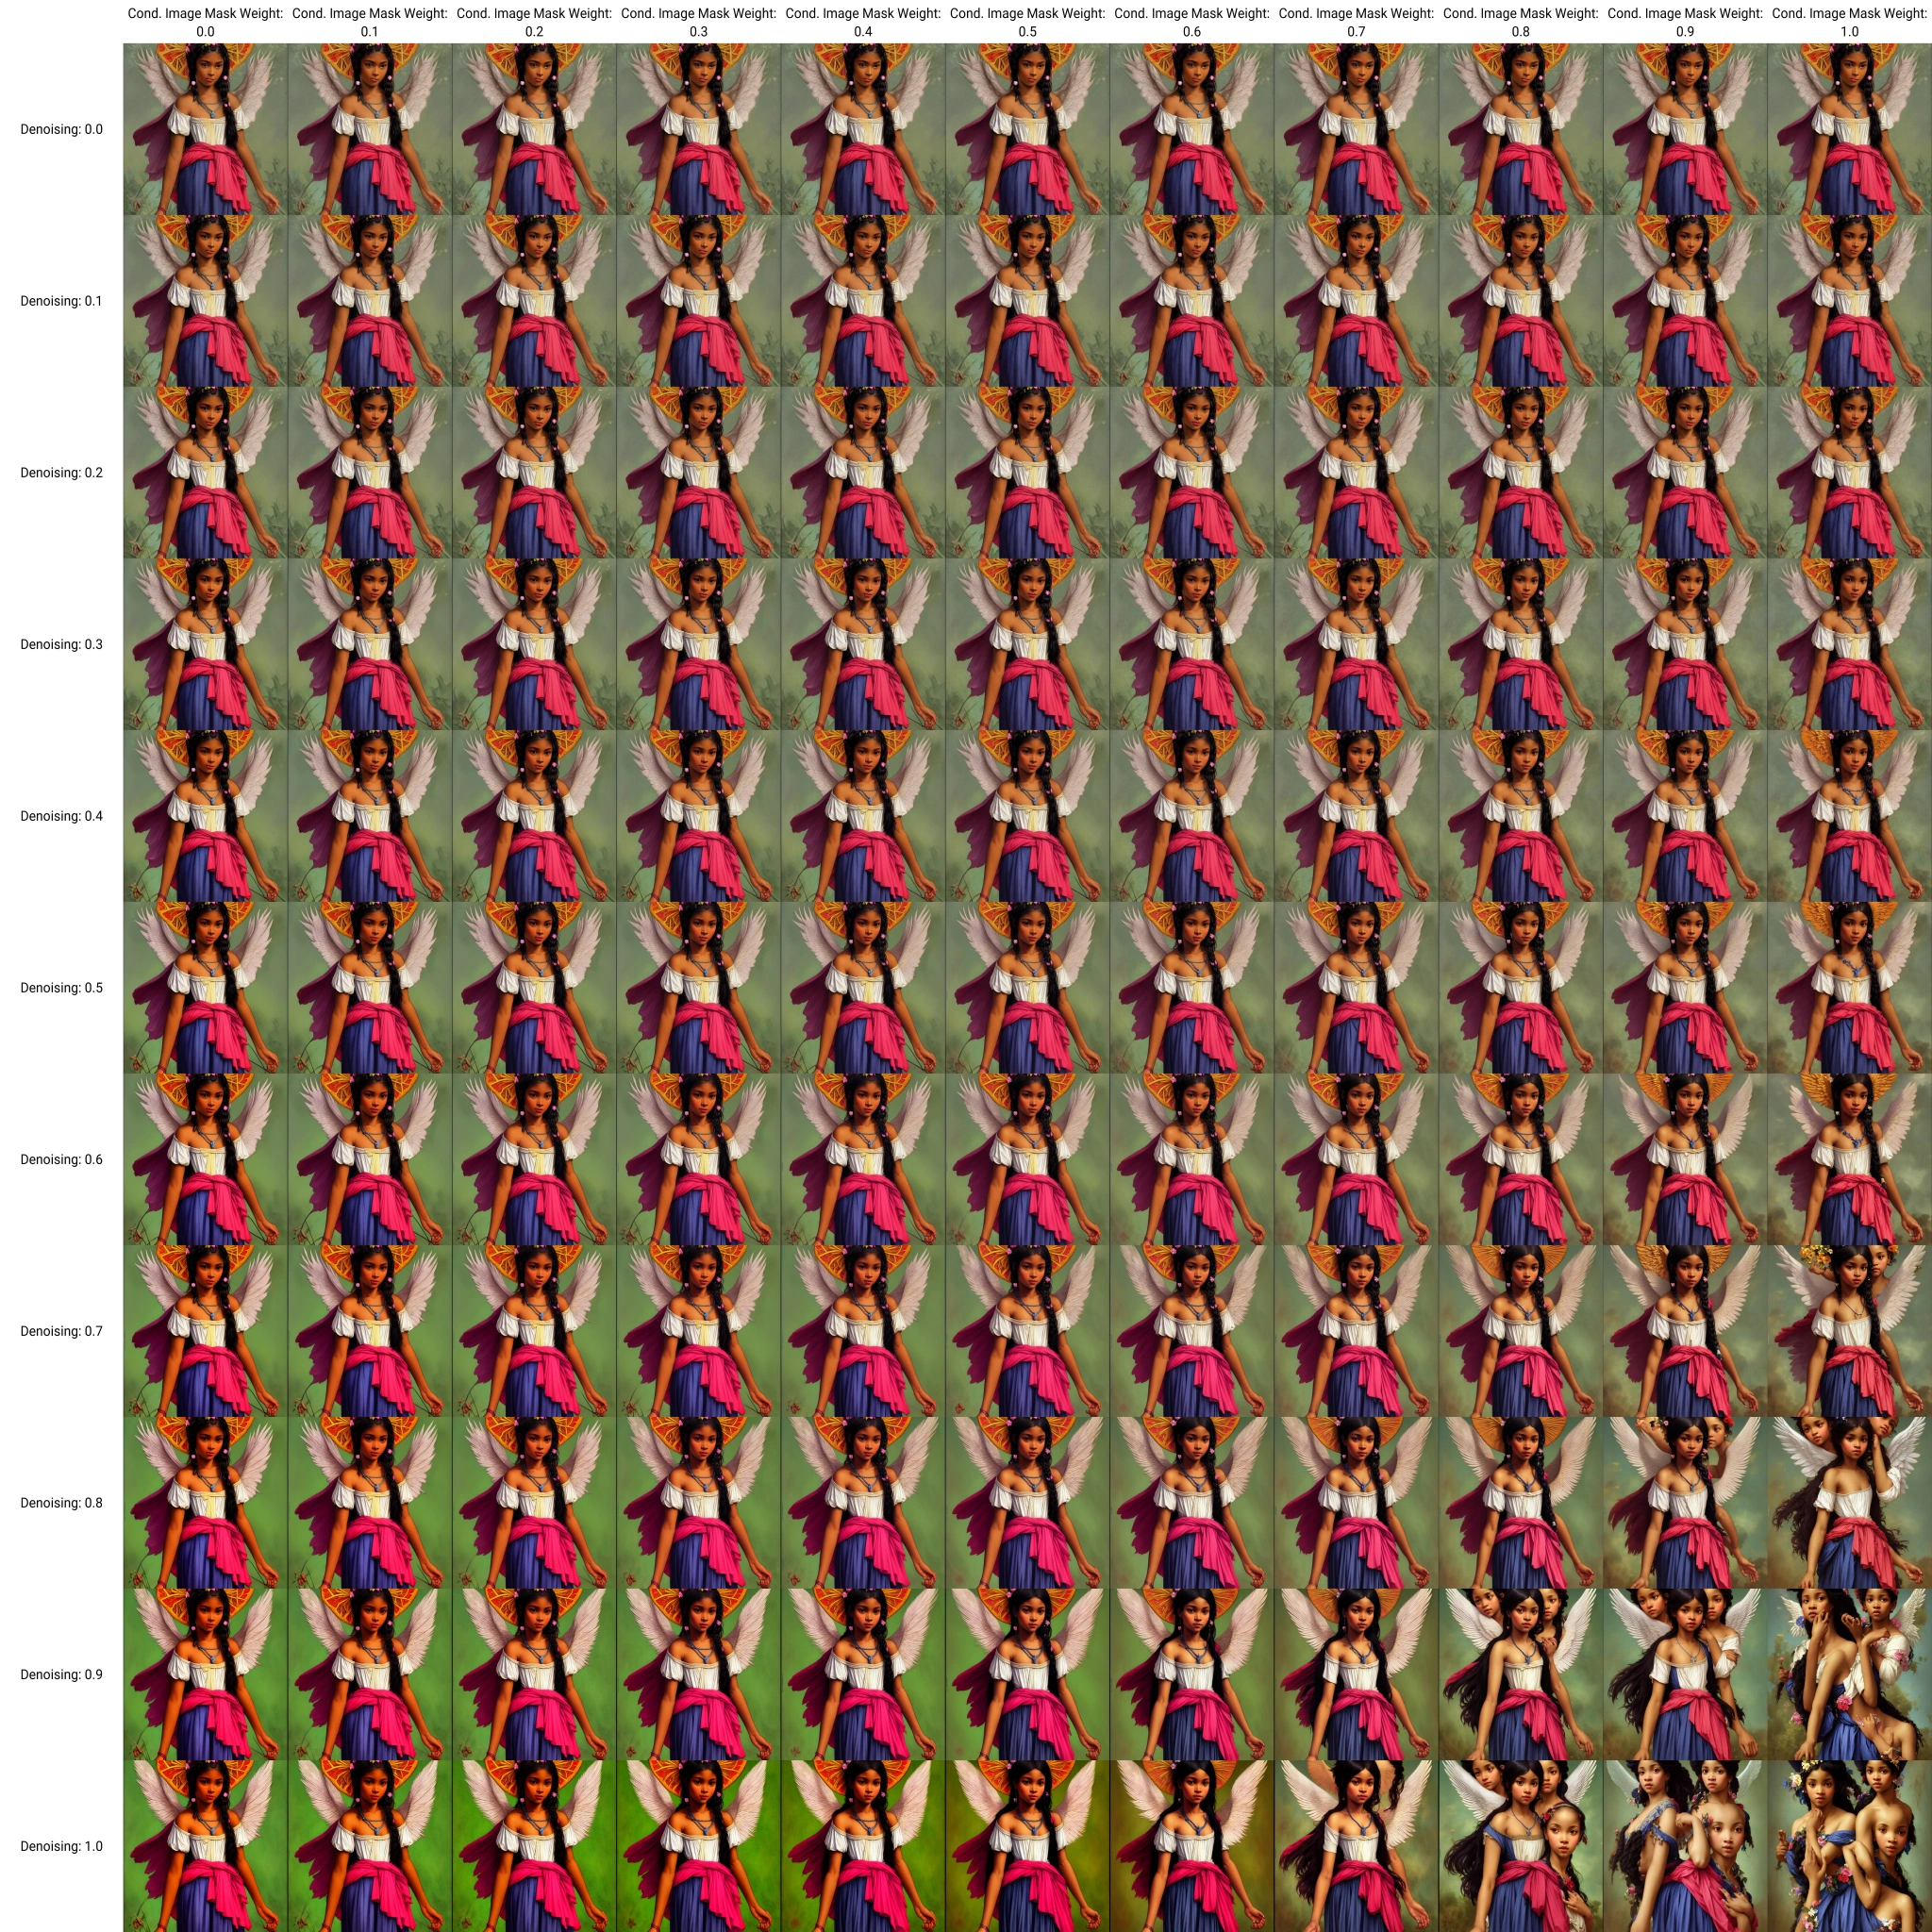
Here is the grid that shows the relation between Denoising strength and Inpainting conditioning mask strength:
|
||
- [Original from txt2img](https://klimaleksus2.ucoz.ru/sd/conditioning-highres-fix_compare.png)
|
||
- [Grid in img2img](https://klimaleksus2.ucoz.ru/sd/conditioning-highres-fix_compare.jpg)
|
||
<details><summary>Preview…</summary>
|
||
|
||
[](https://klimaleksus2.ucoz.ru/sd/conditioning-highres-fix_compare.jpg)
|
||
|
||
</details>
|
||
|
||
_You can load this grid into [xy-plot-online-grid-viewer-v1.htm](https://klimaleksus.github.io/xy-plot-online-grid-viewer/xy-plot-online-grid-viewer-v1.htm) to explore it cell-wise._
|
||
|
||
As you can see, the lower Conditioning strength is, the better and sharper the image will become. On high Denoising strengths the image also becomes over-saturated and somewhat simplified.
|
||
|
||
In contrary, on high Conditioning strengths the duplication artifacts are clearly visible on high Denoising strengths.
|
||
|
||
On low Denoising strength the image will be still blurry unless the Conditioning strength is low. That's why I put "(recommended)" mark on High fix button – to make Conditioning strength as low as possible without over-saturating the image.
|
||
|
||
## Example:
|
||
|
||
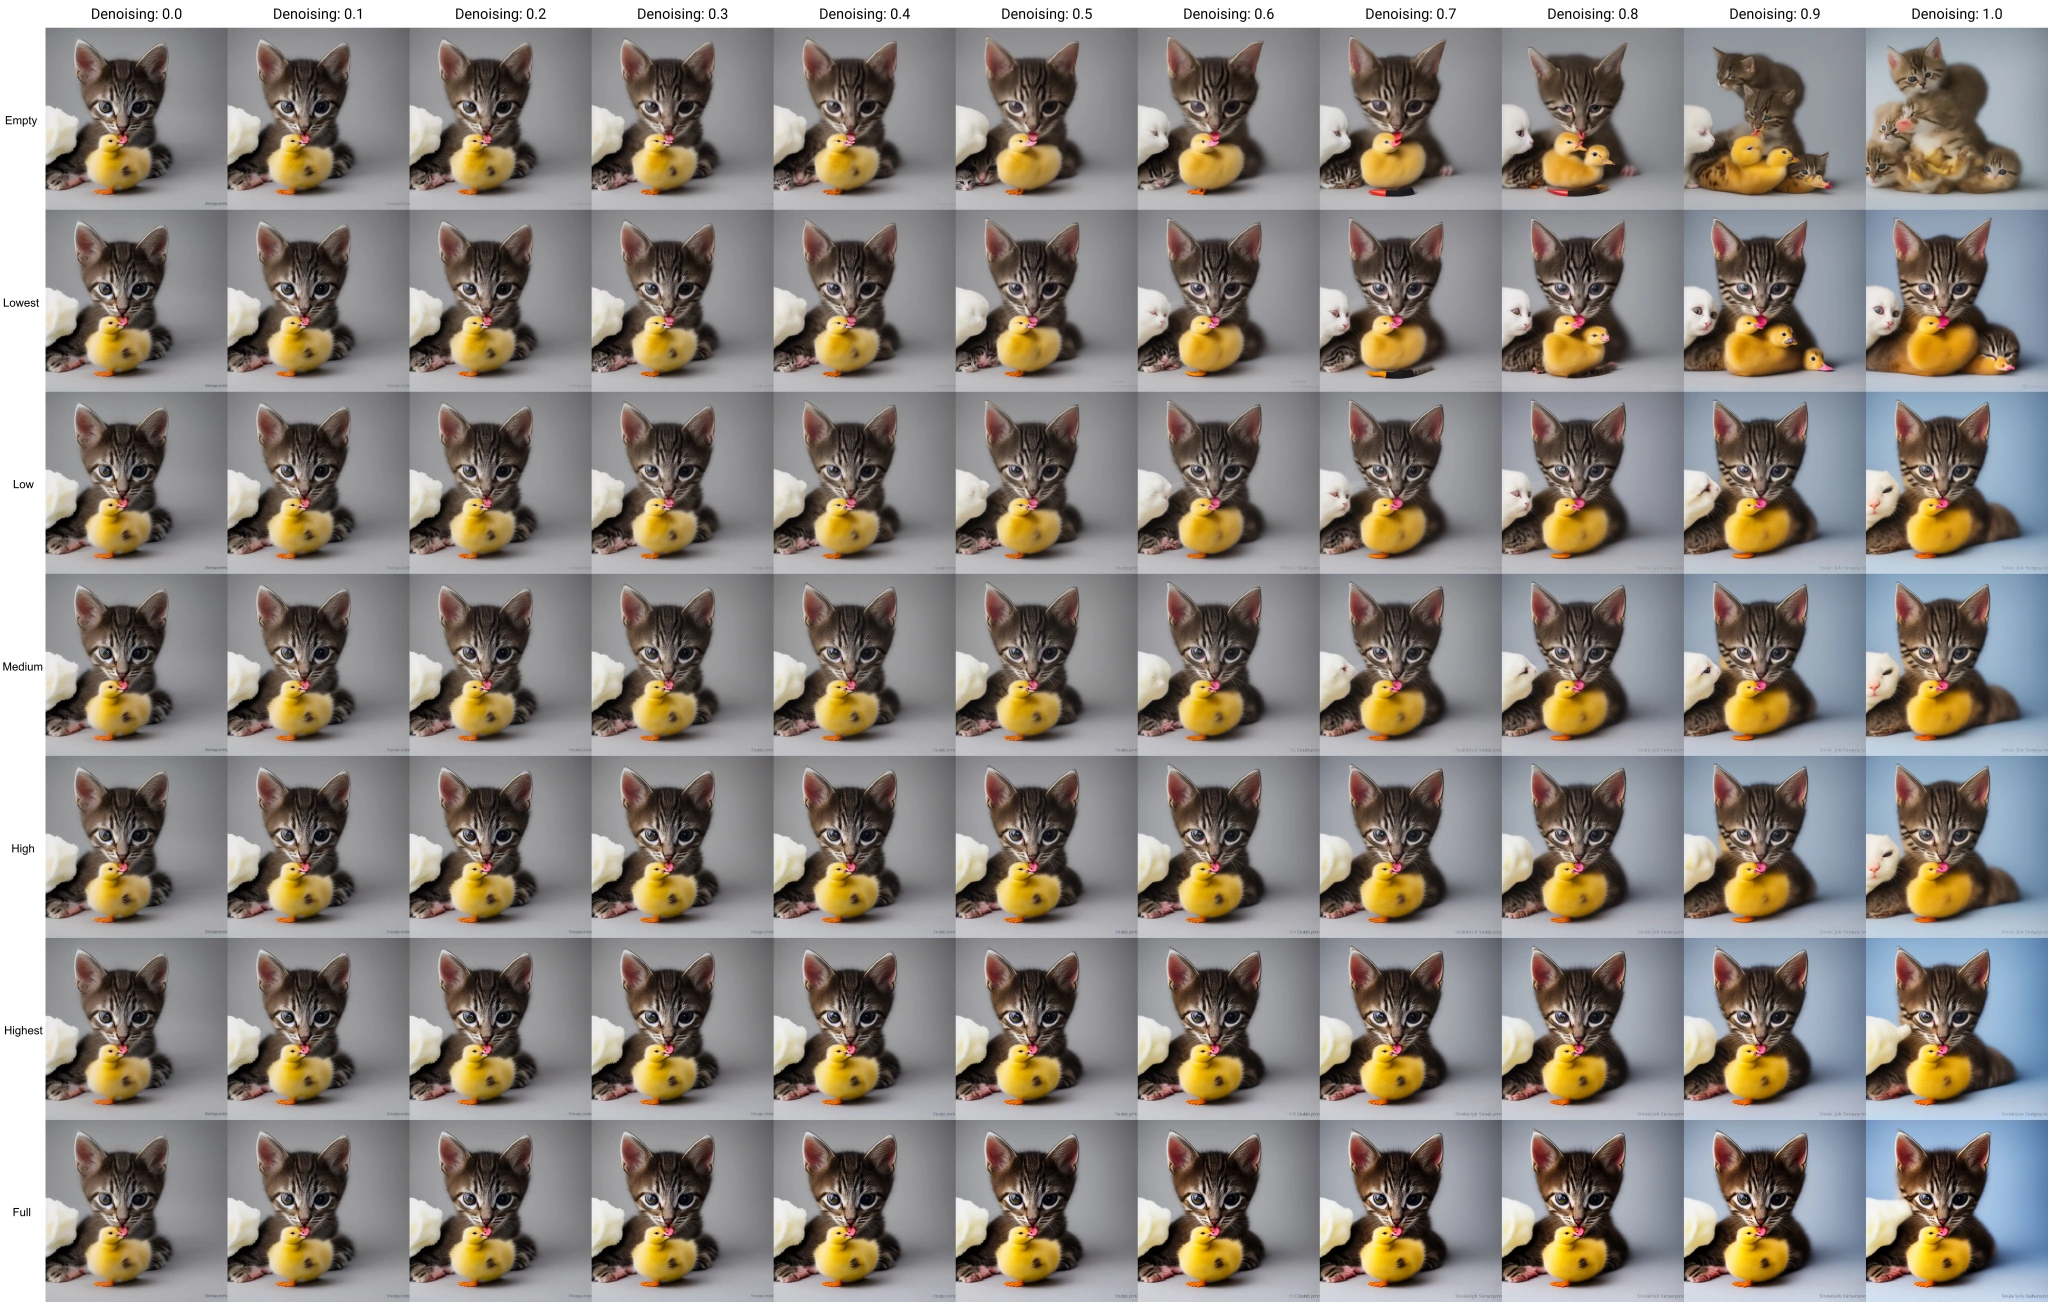
Here is a made-up grid showing different fix levels for variable denoising:
|
||
- [Original from txt2img](https://klimaleksus2.ucoz.ru/sd/conditioning-highres-fix_results.png)
|
||
- [Comparation of applied conditioning-highres-fix](https://klimaleksus2.ucoz.ru/sd/conditioning-highres-fix_results.jpg)
|
||
<details><summary>Preview…</summary>
|
||
|
||
[](https://klimaleksus2.ucoz.ru/sd/conditioning-highres-fix_results.jpg)
|
||
|
||
</details>
|
||
|
||
I believe, "High" row is the best.
|
||
|
||
## F.A.Q.
|
||
|
||
### It doesn't do anything at all!
|
||
Make sure you've loaded "sd-v1-5-inpainting" as your checkpoint. Also, watch the console, the script outputs line "Conditioning Highres.fix:" when it rewrites mask strength.
|
||
|
||
### Why on "high" you actually lower the conditioning?
|
||
Because this means "high level of fix applying", which needs to lower the strength.
|
||
|
||
### Why the image sometimes is not changing between low, medium and high levels?
|
||
That happens only at edge cases, with denoising being 0 or 1. At zero it always spits out original image without doing anything; at one the image is often so much broken that only conditioning=0.5 makes sense. If you specifically want to experiment with very high denoisings – then disable this fix and adjust conditioning yourself. Probably, you won't use highres-fix either.
|
||
|
||
### How can your fix work across different kind of images, since they require different denoising?
|
||
Because the fix controls the conditioning strength relative to your supplied denoising strength. It's you who control the denoising, the fix just makes it more stable.
|
||
|
||
### I tried your formula C=D/2 on some random pictures and I can assure you, it isn't the "best" for all cases!
|
||
Because this approach was made specifically for "Highres. fix" option. And also for manually upscaling images **with the same prompt** they were made! Otherwise, you will get _different_ image, with conditioning fighting with denoising instead of helping it.
|
||
|
||
### Is it still applies for Inpainting and outpainting?
|
||
Yes. Most probably, you don't want this to happen, so don't forget to disable it.
|