295 lines
16 KiB
Markdown
295 lines
16 KiB
Markdown
# Tiled Diffusion & VAE
|
||
|
||
[![CC BY-NC-SA 4.0][cc-by-nc-sa-shield]][cc-by-nc-sa]
|
||
|
||
English|[中文](README_CN.md)
|
||
|
||
Please be aware that the License of this repo has changed to prevent some web shops from deceiving the customers. This extension is licensed under [CC BY-NC-SA](https://creativecommons.org/licenses/by-nc-sa/4.0/), everyone is FREE of charge to access, use, modify and redistribute with the same license.
|
||
**You cannot use versions after AOE 2023.3.28 for commercial sales (only refers to code of this repo, the derived artworks are NOT restricted).**
|
||
|
||
由于部分无良商家销售WebUI,捆绑本插件做卖点收取智商税,本仓库的许可证已修改为 [CC BY-NC-SA](https://creativecommons.org/licenses/by-nc-sa/4.0/),任何人都可以自由获取、使用、修改、以相同协议重分发本插件。
|
||
**自许可证修改之日(AOE 2023.3.28)起,之后的版本禁止用于商业贩售 (不可贩售本仓库代码,但衍生的艺术创作内容物不受此限制)。**
|
||
|
||
If you like the project, please give me a star! ⭐
|
||
|
||
****
|
||
|
||
The extension enables **large image drawing & upscaling with limited VRAM** via the following techniques:
|
||
|
||
1. Two SOTA diffusion tiling algorithms: [Mixture of Diffusers](https://github.com/albarji/mixture-of-diffusers) and [MultiDiffusion](https://multidiffusion.github.io)
|
||
2. My original Tiled VAE algorithm.
|
||
3. My original TIled Noise Inversion for better upscaling.
|
||
|
||
|
||
## Features
|
||
|
||
- [ ] Frequency Separation & Swap in post-processing (working on)
|
||
- [x] [Tiled Noise Inversion](#🆕-tiled-noise-inversion)
|
||
- [x] [Tiled VAE](#🔥-tiled-vae)
|
||
- [x] [Regional Prompt Control](#region-prompt-control)
|
||
- [x] [Img2img upscale](#img2img-upscale)
|
||
- [x] [Ultra-Large image generation](#ultra-large-image-generation)
|
||
|
||
=> Quickstart Tutorial: [Tutorial for multidiffusion upscaler for automatic1111](https://civitai.com/models/34726), thanks to [@PotatoBananaApple](https://github.com/pkuliyi2015/multidiffusion-upscaler-for-automatic1111/discussions/120) 🎉
|
||
|
||
****
|
||
|
||
### 🆕 Combine with ControlNet v1.1 Tile Model
|
||
|
||
> High quality large images with tidy details.
|
||
|
||
- Our Tiled Noise Inversion feature can cooperate with ControlNet v1.1 tile model (CN Tile, for short) to produce amazingly clear results with proper details. [Example](https://imgsli.com/MTc2MDU0)
|
||
- CN Tile with large denoising strengths (i.e. >= 0.4) tends to produce overly sufficient details, making the image look dirty or messy.
|
||
- MultiDiffusion Noise Inversion tends to produce tidy but overly retouched images without enough details.
|
||
- Combine the two, you get amazingly good results:
|
||
- Clear lines, edges, and colors
|
||
- Proper and reasonable details, no weird or dirty pieces.
|
||
- Recommended settings:
|
||
- Denoising Strength >= 0.75
|
||
- Method = Mixture of Diffusers, Overlap = 8
|
||
- Noise Inversion Steps >= 30
|
||
- **Renoise strength = 0**
|
||
- CN Tile preprocessor = tile_resample, downsampling rate = 2
|
||
- If your result is blurry:
|
||
- Try higher Noise Inversion Steps.
|
||
- Try lower Denoising Strength.
|
||
- Try another checkpoint.
|
||
- Compare with pure CN Tile.
|
||
- [Comparison1](https://imgsli.com/MTc1OTc3), 50 NI steps, denoise = 0.75
|
||
- [Comparison2](https://imgsli.com/MTc1OTc4), 200 NI steps, denoise = 1
|
||
- Note that high denoising strengths will change the image color. This is a known issue of CN Tile that cannot be fixed by us.
|
||
|
||
### Tiled Noise Inversion
|
||
|
||
> safe Img2Img without painting structure change
|
||
|
||
- **Ultra high-consistency image upscale**, up to 8k resolution in 12G memory.
|
||
- Especially good when you don't want to wildly change your character's face.
|
||
- 4x upscaling demo, denoising strength=0.4: [comparison 1](https://imgsli.com/MTY1NzM1), [comparison 2](https://imgsli.com/MTY2MTY5)
|
||
- Compare to Ultimate SD Upscale, the algorithm is **much more faithful to the original image** and produces significantly fewer artifacts. See the Comparison with Ultimate SD Upcaler (at its optimal denoising strength=0.3) [comparison 1](https://imgsli.com/MTY1NzUw), [comparison 2](https://imgsli.com/MTY2MTcx)
|
||
|
||
⚠ Instead of generating an 8k image at once, you should first try the default parameters with a small image and a small upscale factor (i.e., 1.5) to see if it works.
|
||
⚠ Generally, the denoising strength needs to be <= 0.6. It is not very sensitive to CFG values, so you can try it free.
|
||
|
||
****
|
||
|
||
### 🔥 Tiled VAE
|
||
|
||
> Dramatically save your VRAM usage on VAE encoding / decoding
|
||
|
||
- **It saves your VRAM at nearly no cost.**
|
||
- You may not need --lowvram or --medvram anymore.
|
||
- Take highres.fix as an example, if you can only do 1.5x upscale previously, you may do 2.0x upscale with it now.
|
||
- Normally you can use default settings without changing them.
|
||
- But if you see CUDA out of memory error, just lower the two tile sizes.
|
||
|
||
****
|
||
|
||
### Regional Prompt Control
|
||
|
||
> Draw large images by fusing multiple regions together.
|
||
|
||
⚠ we recommend you use custom regions to fill the whole canvas.
|
||
|
||
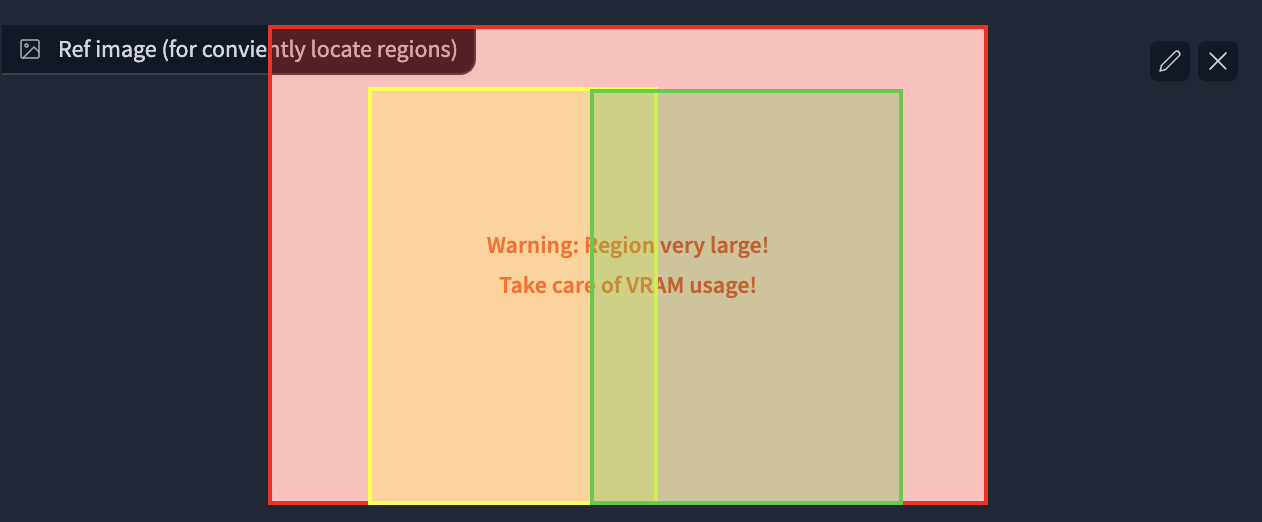
#### Example 1: draw multiple characters at a high resolution
|
||
|
||
- Params:
|
||
- Ckpt: Anything V4.5, 1920 * 1280 (no highres), method=Mixture of Diffusers
|
||
- Main prompt = masterpiece, best quality, highres, extremely clear 8k wallpaper, white room, sunlight
|
||
- Negative prompt = ng_deepnegative_v1_75t EasyNegative
|
||
- **The tile size parameters become useless; just ignore them.**
|
||
|
||
- Regions:
|
||
- Region 1: Prompt = sofa, Type = Background
|
||
- Region 2: Prompt = 1girl, gray skirt, (white sweater), (slim) waist, medium breast, long hair, black hair, looking at viewer, sitting on sofa, Type = Foreground, Feather = 0.2
|
||
- Region 3: Prompt = 1girl, red silky dress, (black hair), (slim) waist, large breast, short hair, laughing, looking at viewer, sitting on sofa, Type = Foreground, Feather = 0.2
|
||
|
||
- Region Layout:
|
||
|
||
|
||
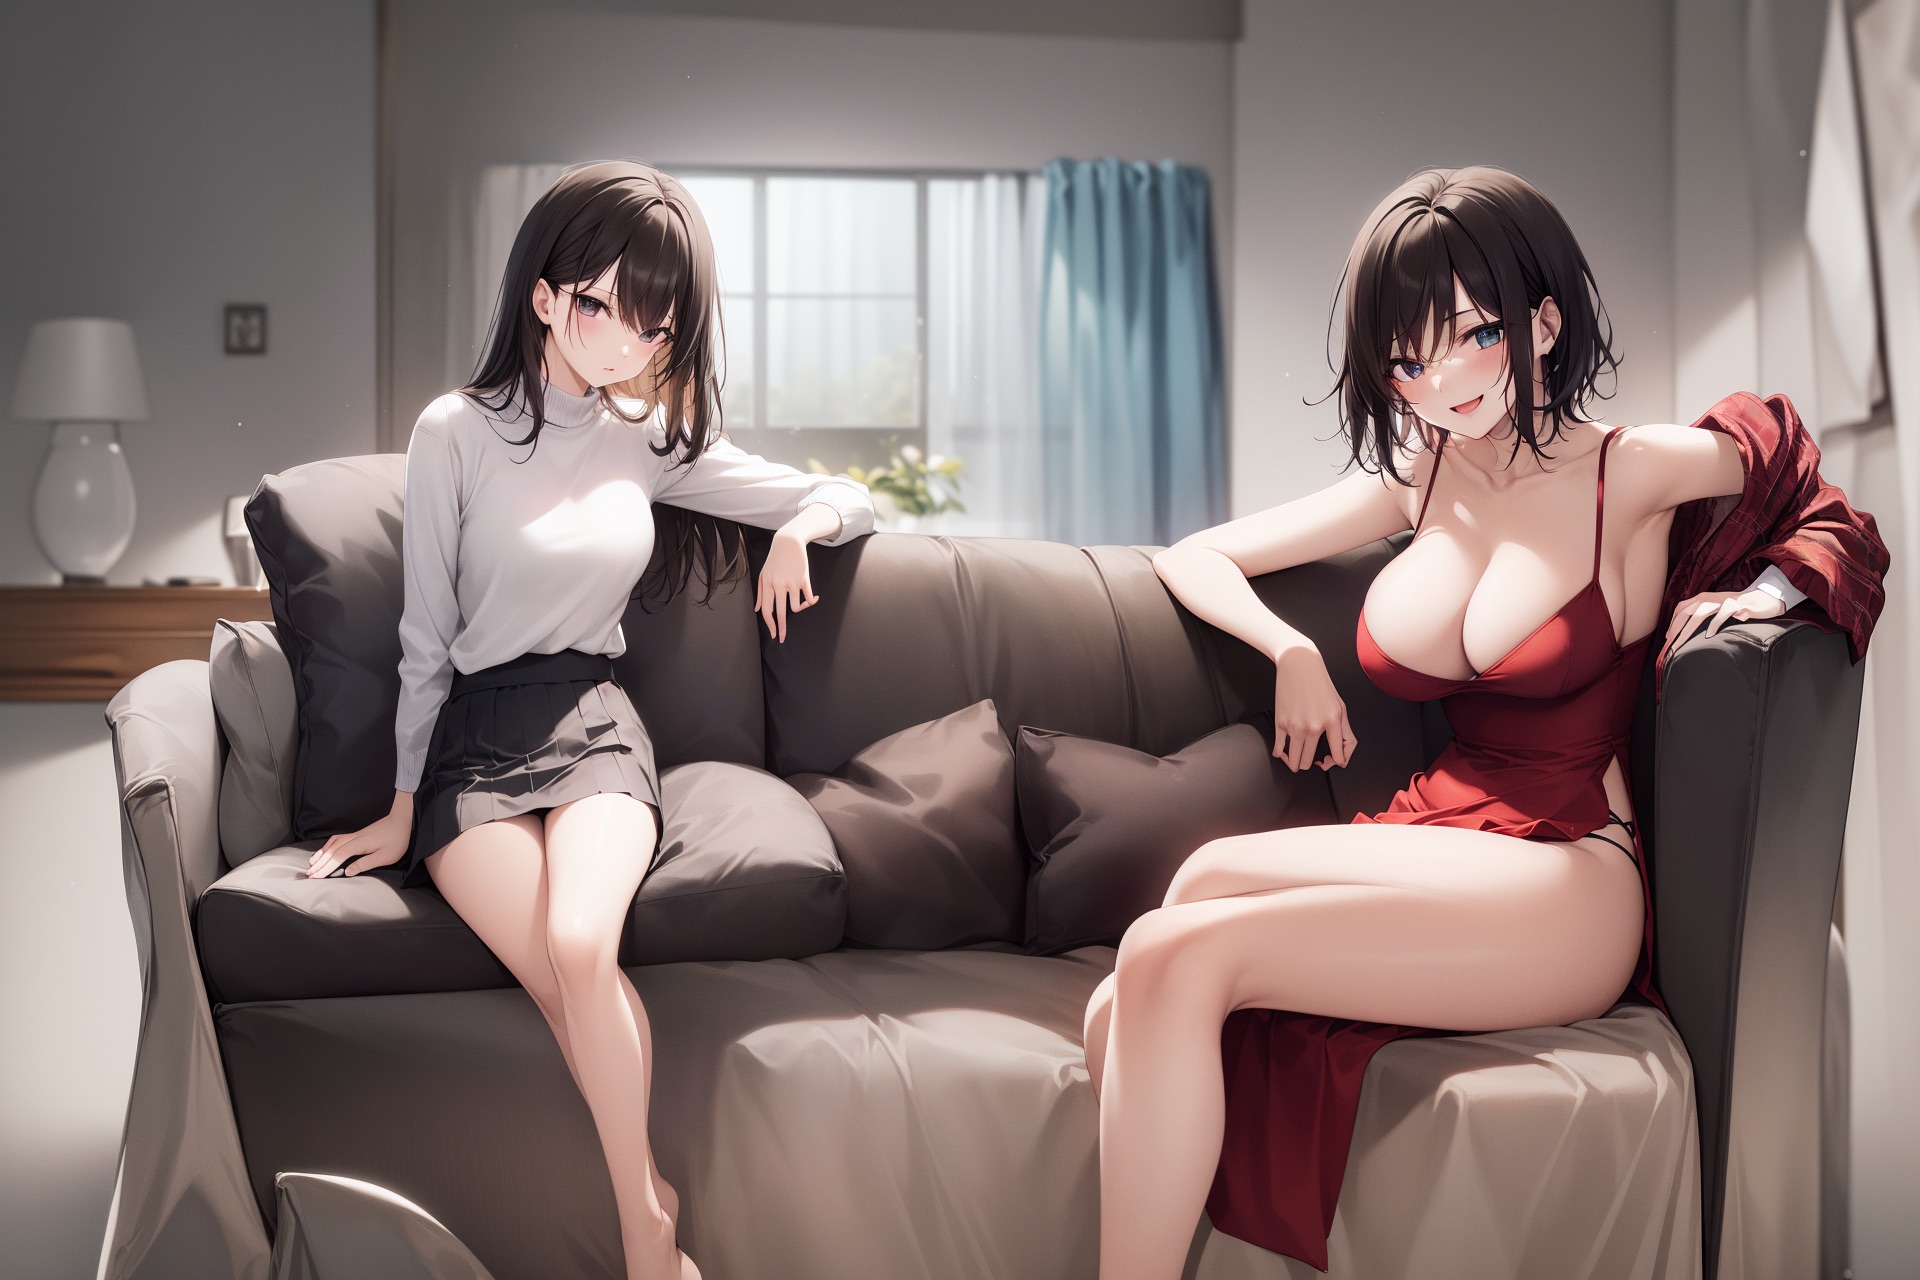
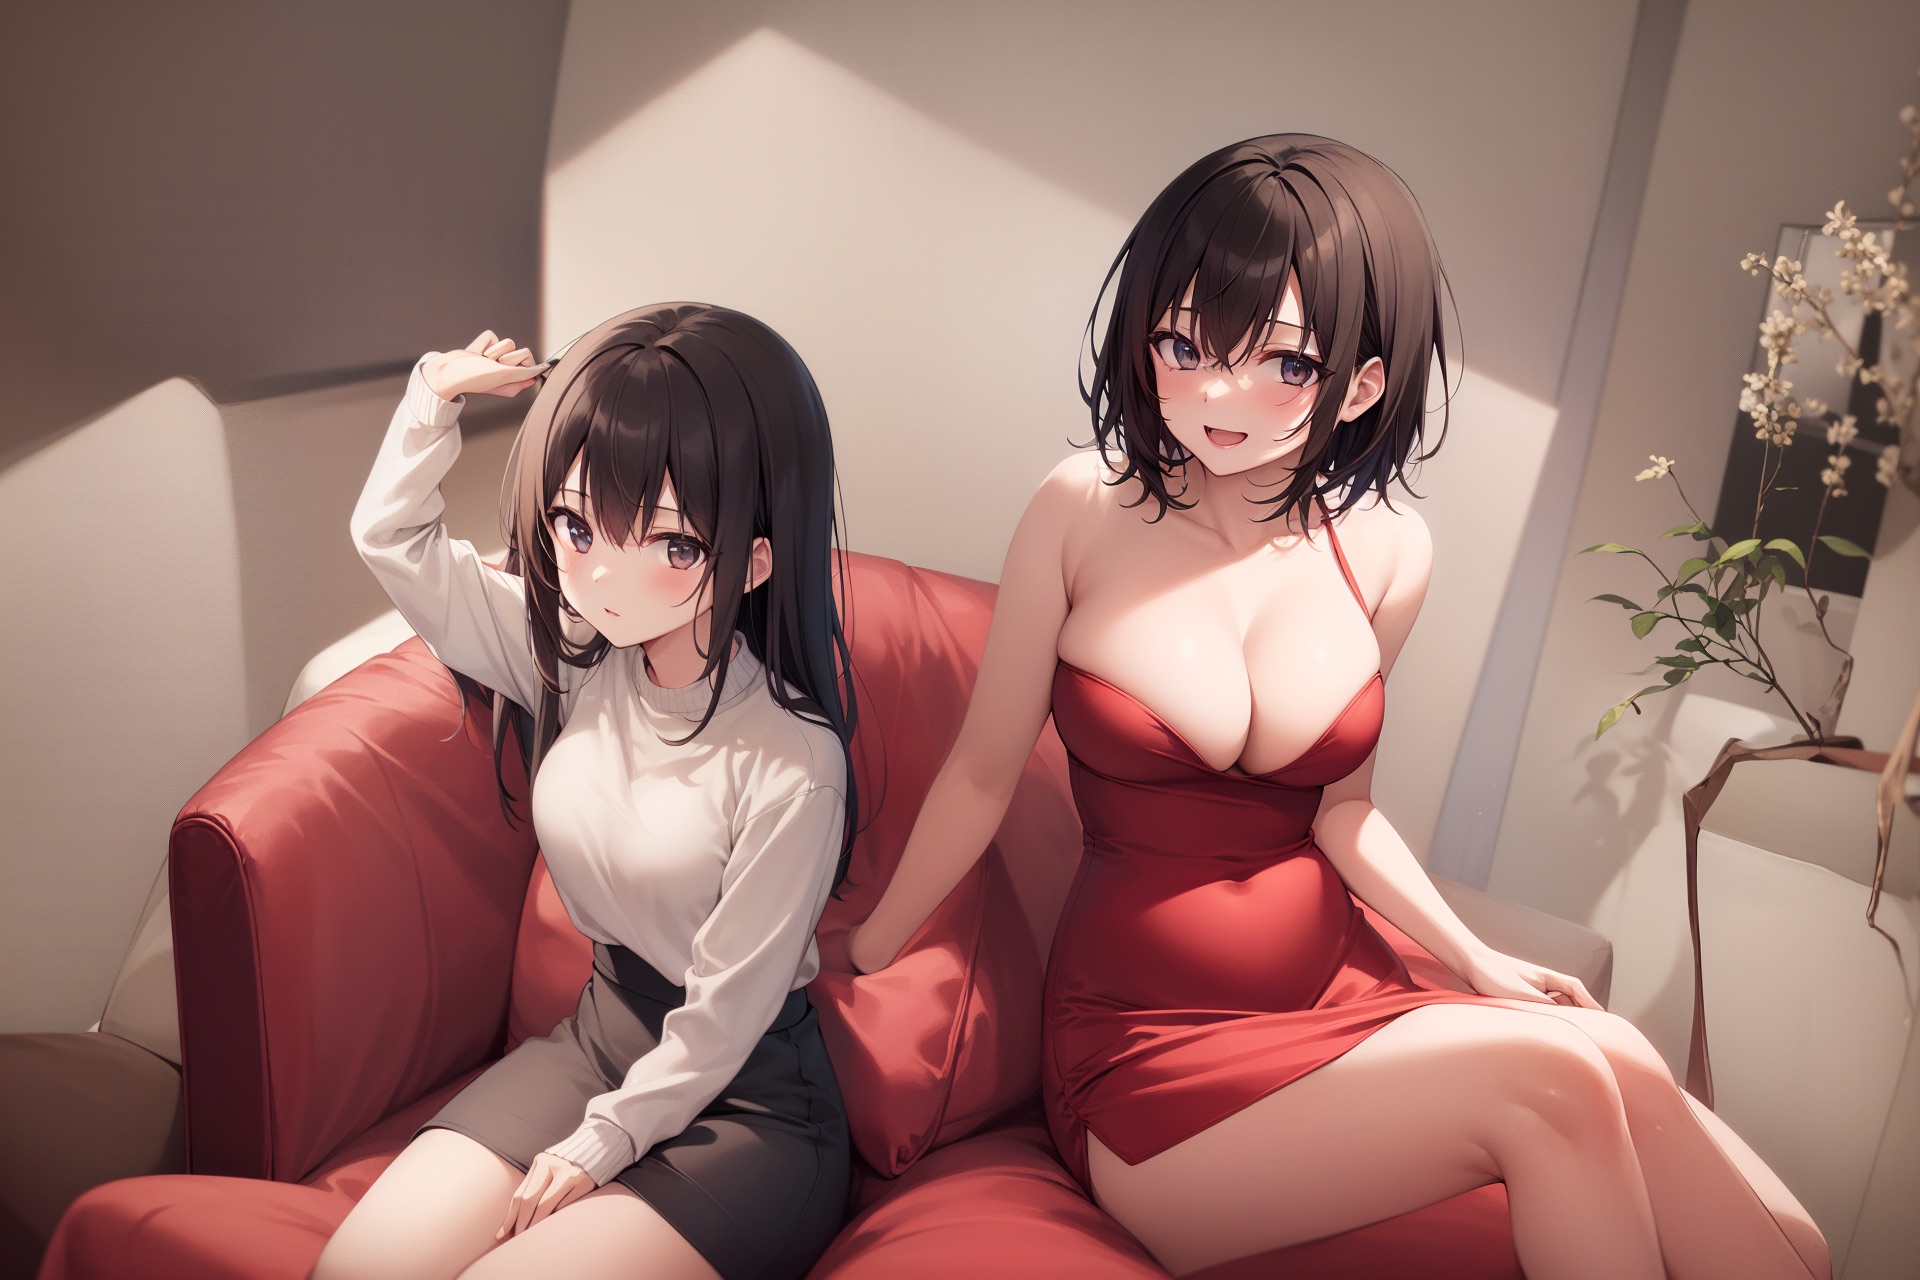
- Result (2 out of 4)
|
||
|
||
|
||
|
||
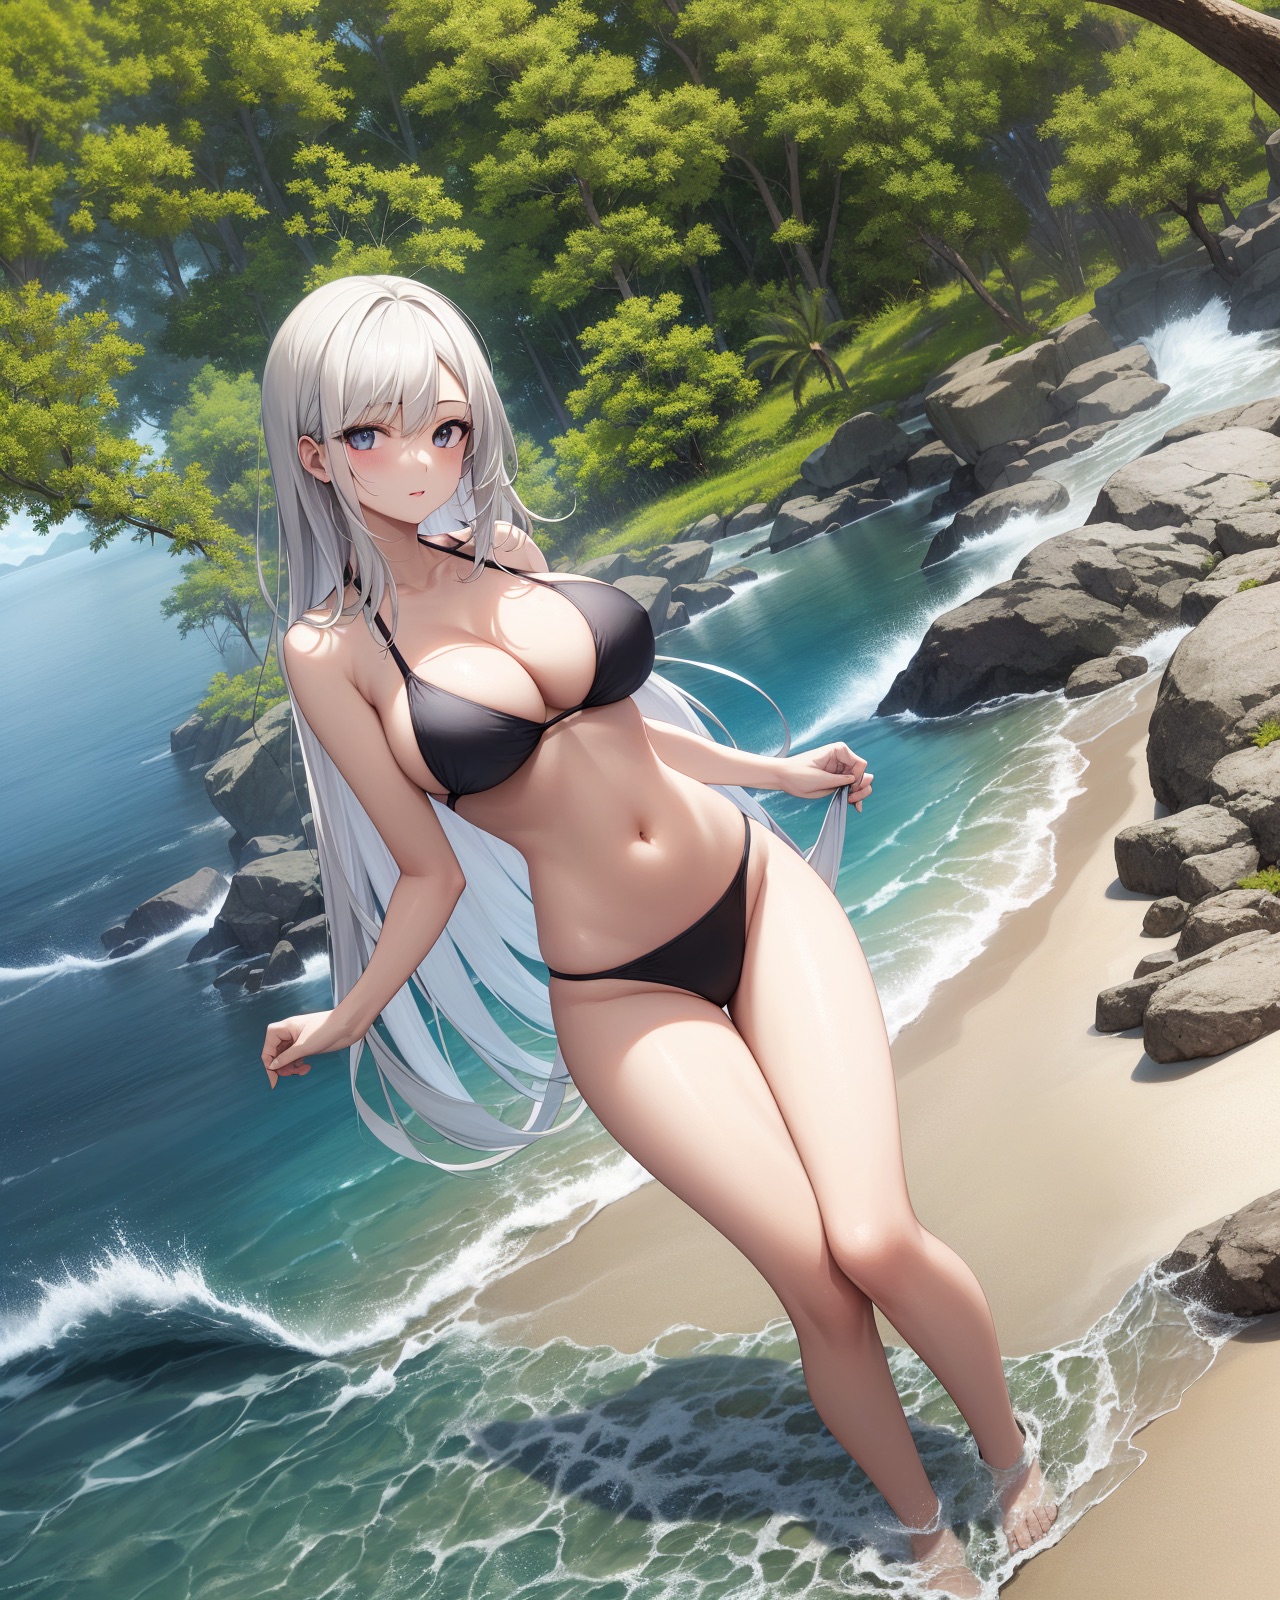
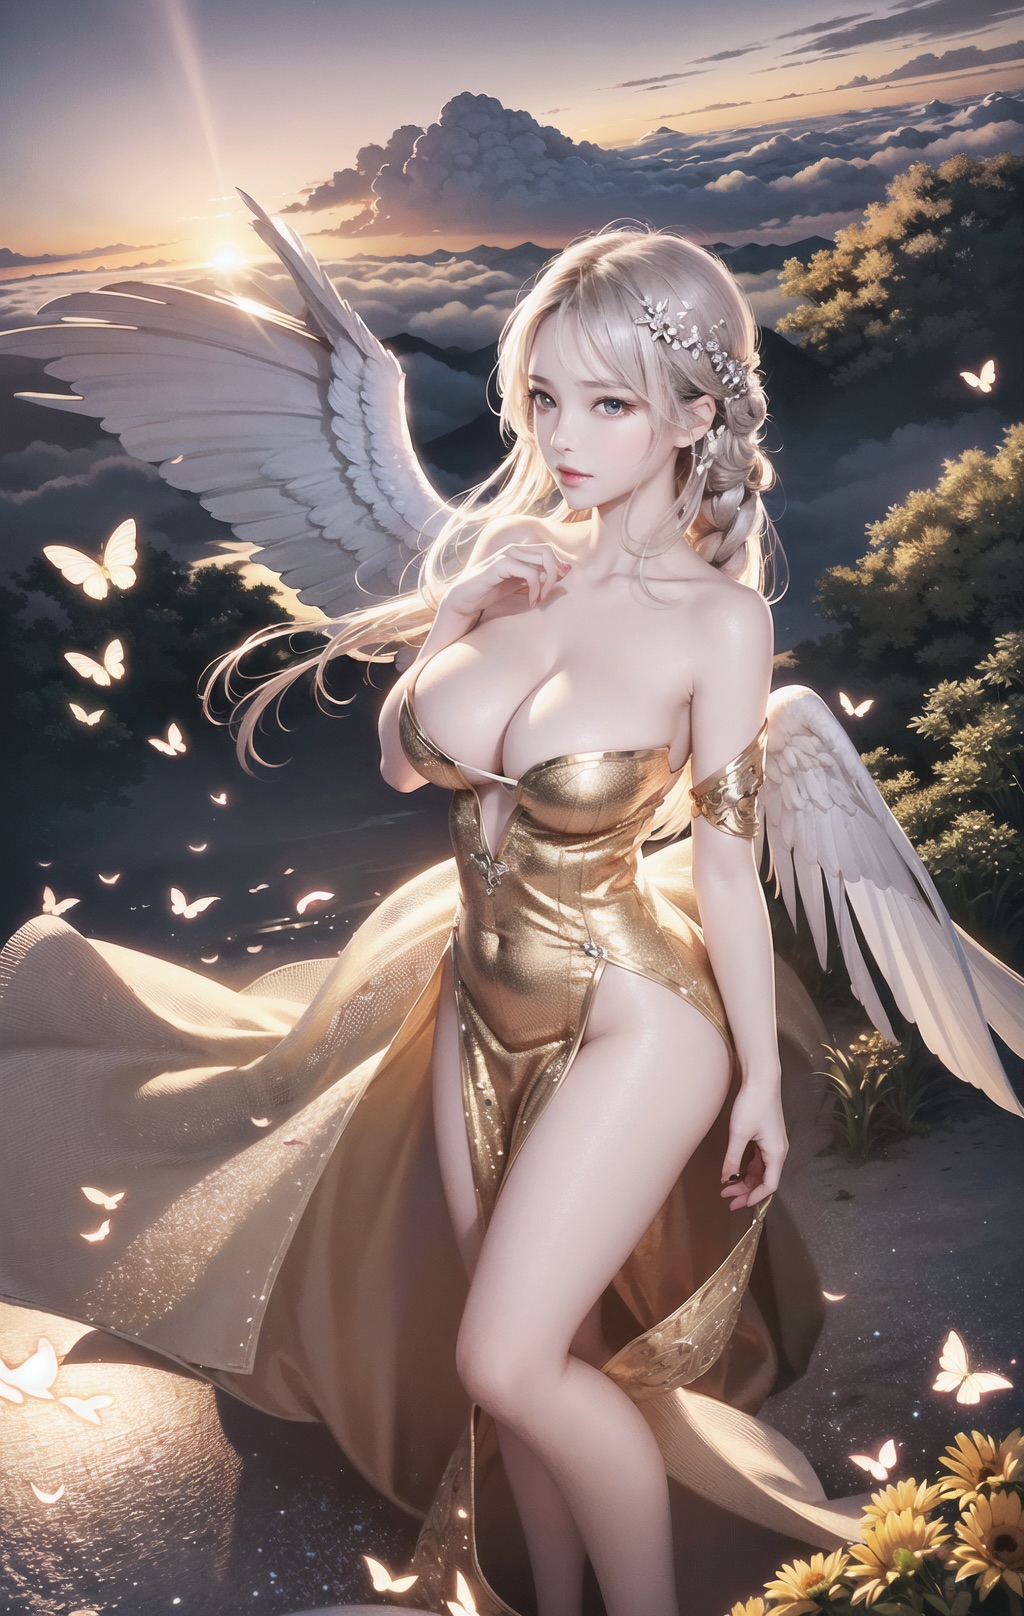
#### Example 2: draw a full-body character
|
||
|
||
ℹ Usually, it is difficult to draw a full-body character at a high resolution (e.g., it may concatenate two bodies).
|
||
ℹ By putting your character in your background, it becomes much easier.
|
||
|
||
- Params:
|
||
- Ckpt: Anything V4.5, width = 1280, height = 1600 (no highres), method=MultiDiffusion
|
||
- Main prompt: masterpiece, best quality, highres, extremely clear 8k wallpaper, beach, sea, forest
|
||
- Neg prompt: ng_deepnegative_v1_75t EasyNegative
|
||
|
||
- Regions:
|
||
- Region 1 Prompt = 1girl, black bikini, (white hair), (slim) waist, giant breast, long hair, Type = Foreground, Feather: 0.2
|
||
- Region 2 Prompt = (empty), Type: Background
|
||
|
||
- Region Layout
|
||

|
||
|
||
- Result: 32s, 4729 MB on NVIDIA V100. I was lucky to get this at once without cherry-picks.
|
||
|
||
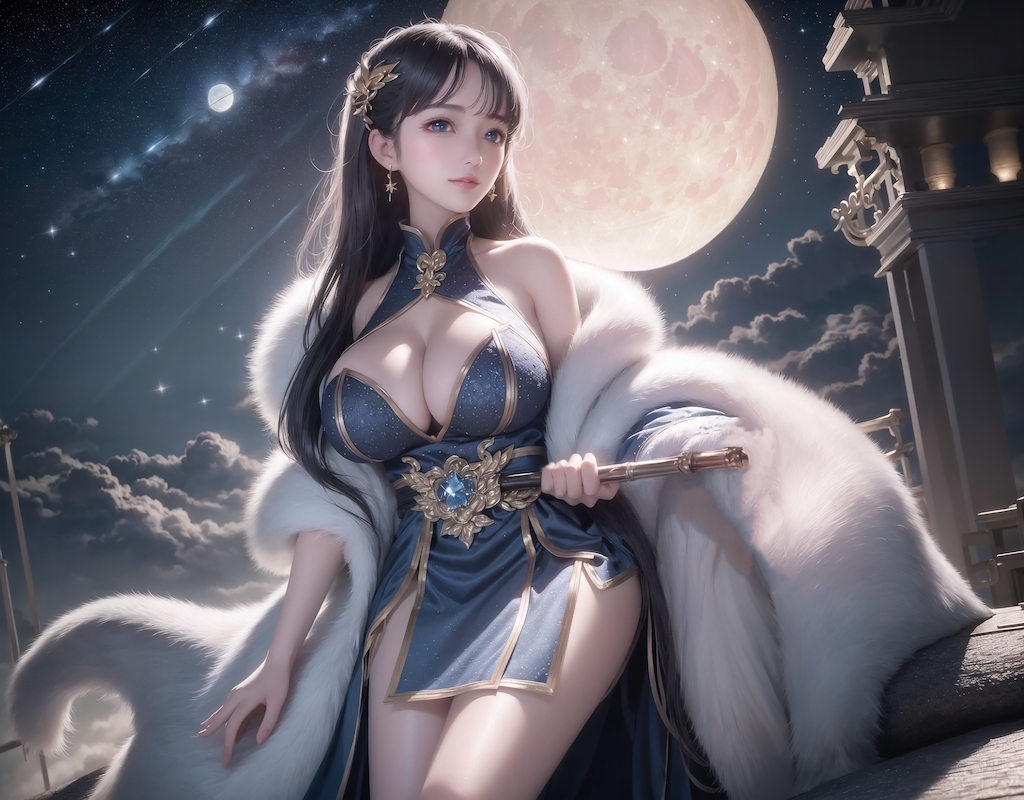
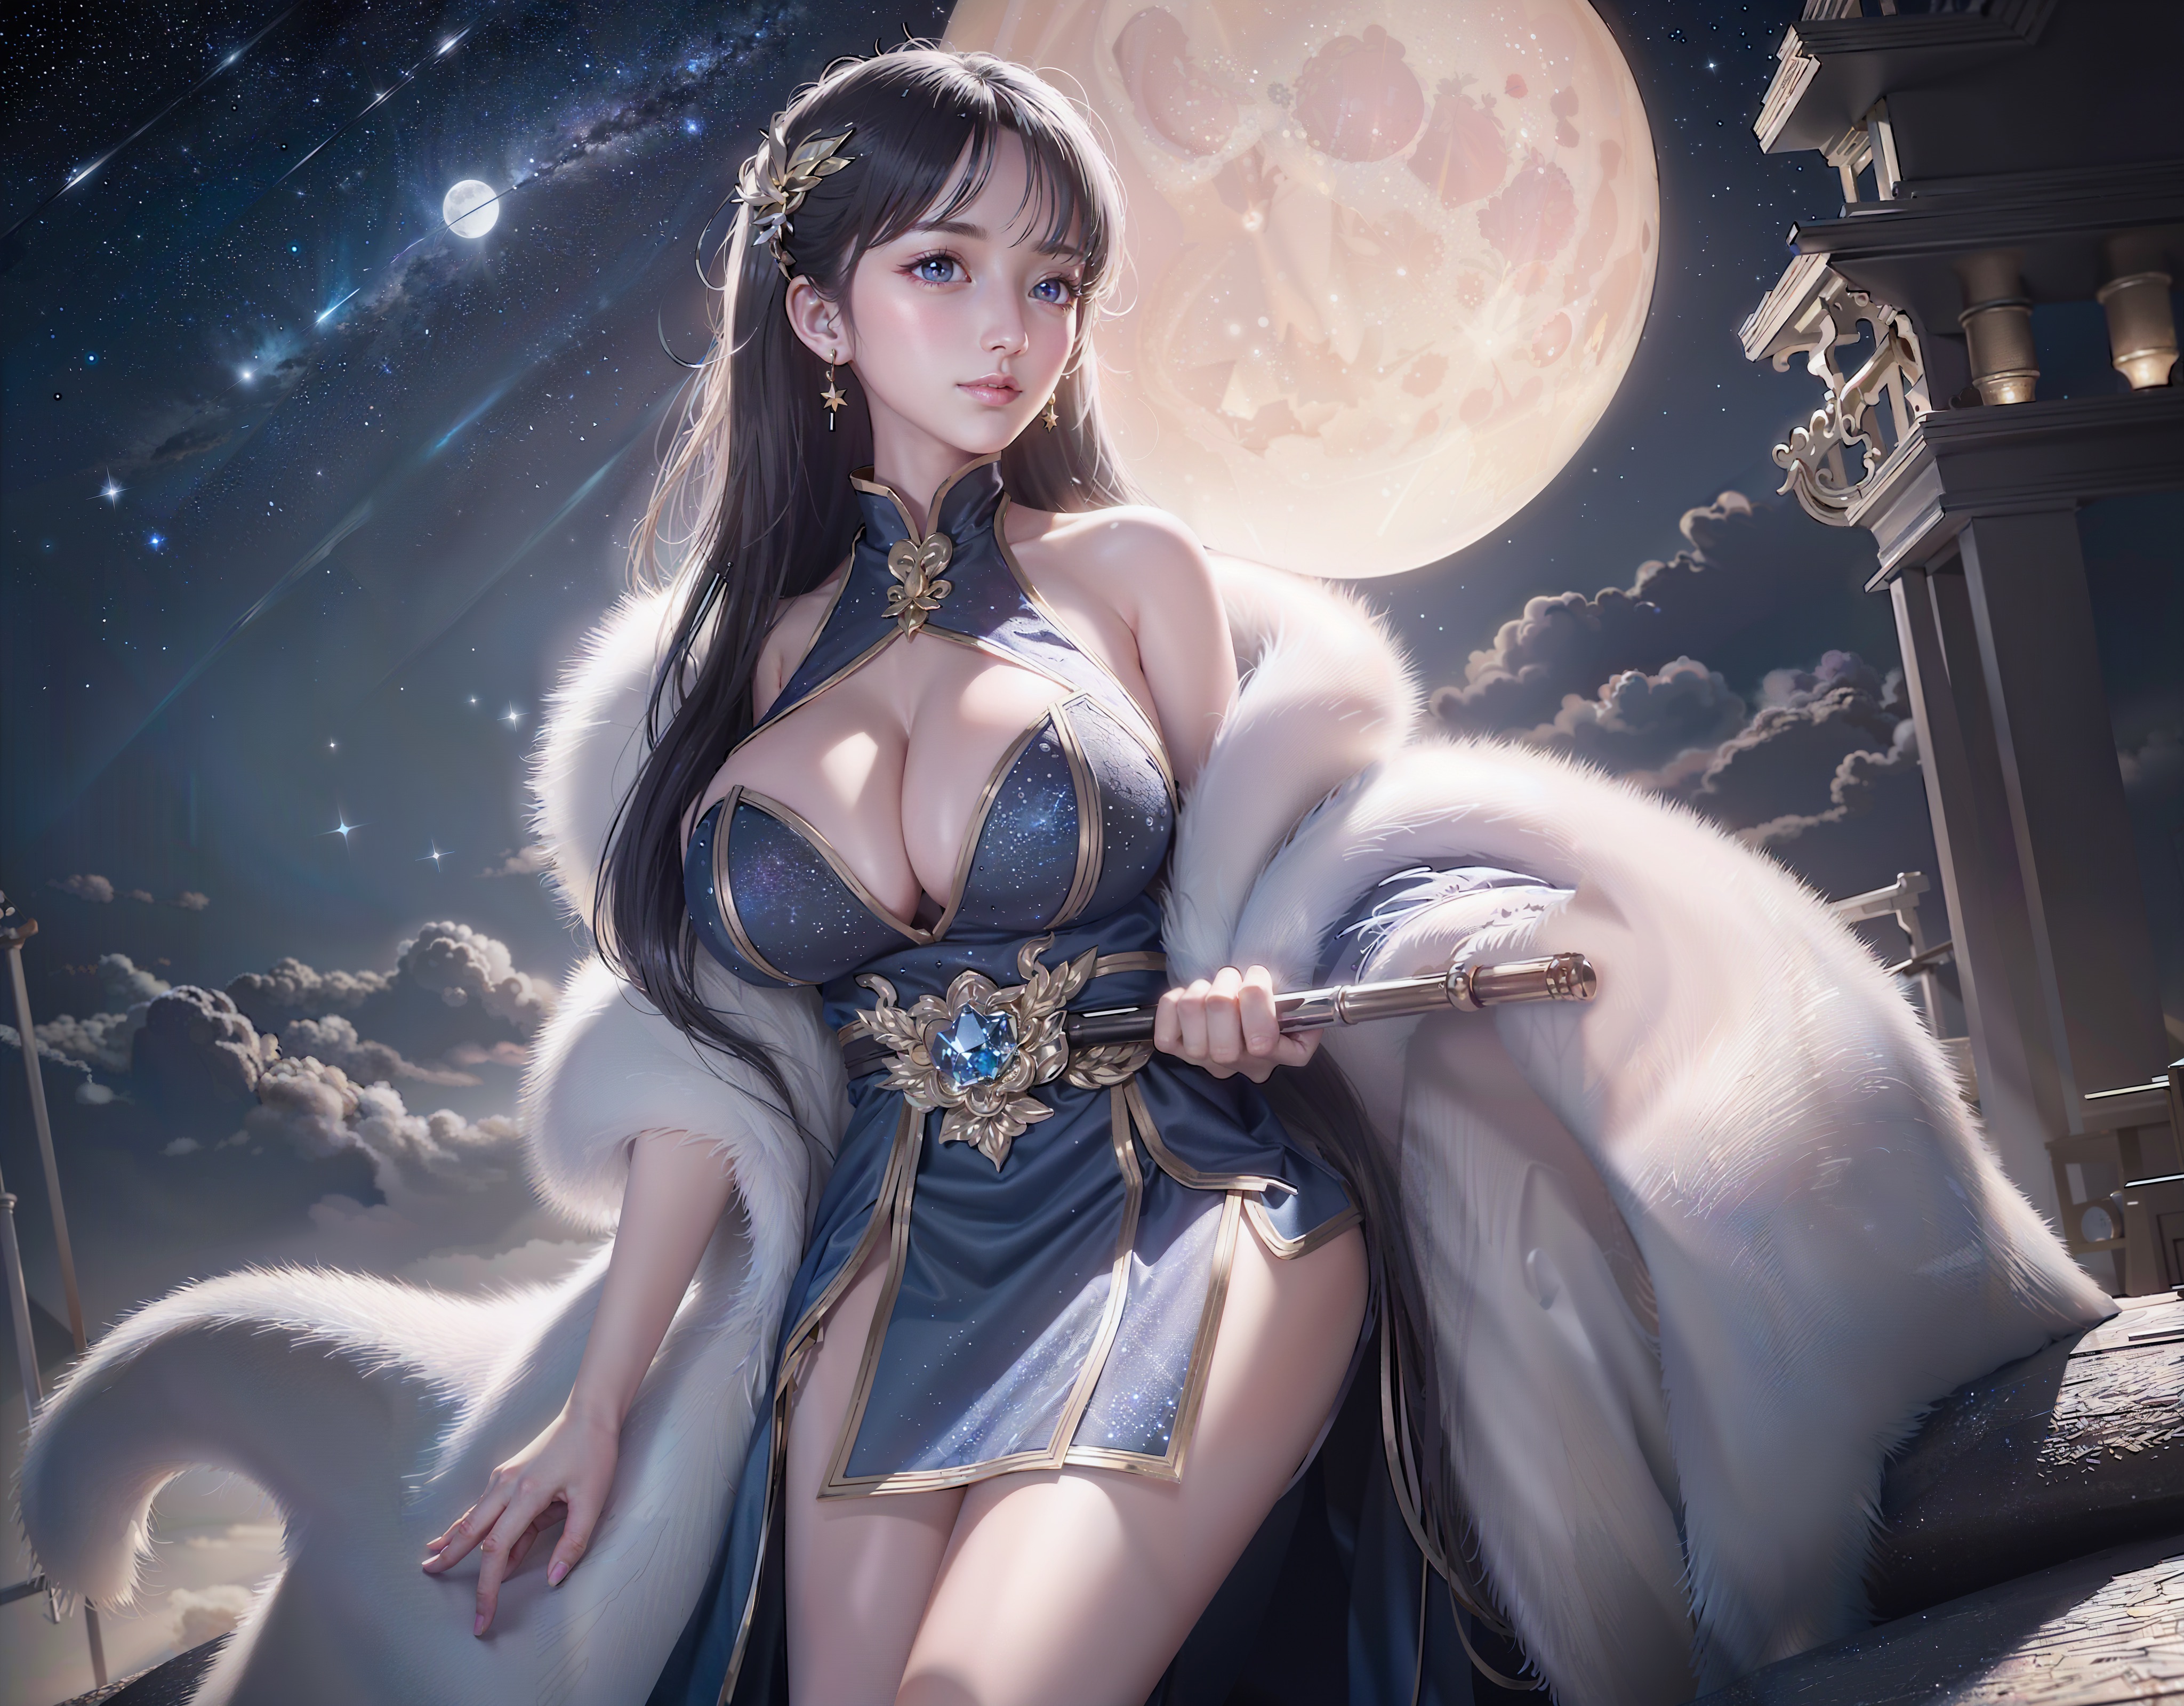
- Also works well for 2.5D characters. For example, the 1024*1620 image generation
|
||
- Great thanks to all settings from @辰熙. Click here for more of her artworks: https://space.bilibili.com/179819685
|
||
- Cherry-picked from 20 generations.
|
||
|
||
|
||
****
|
||
|
||
### Img2img upscale
|
||
|
||
> Leverage Tiled Diffusion to upscale & redraw large images
|
||
|
||
#### Example: 1024 * 800 -> 4096 * 3200 image, with default params
|
||
|
||
- Params:
|
||
- denoise=0.4, steps=20, Sampler=Euler a, Upscaler=RealESRGAN++, Negative Prompts=EasyNegative,
|
||
- Ckpt: Gf-style2 (4GB version), CFG Scale = 14, Clip Skip = 2
|
||
- method = MultiDiffusion, tile batch size = 8, tile size height = 96, tile size width = 96, overlap = 32
|
||
- Prompt = masterpiece, best quality, highres, extremely detailed 8k wallpaper, very clear, Neg prompt = EasyNegative.
|
||
|
||
- Before upscaling
|
||
|
||
- After 4x upscale, No cherry-picking. 1min12s on NVIDIA Tesla V100. (If 2x, it completes in 10s)
|
||
|
||
|
||
****
|
||
|
||
### Ultra-Large image generation
|
||
|
||
ℹ Please use simple positive prompts at the top of the page, as they will be applied to each tile.
|
||
ℹ If you want to add objects to a specific position, use **regional prompt control** and enable **draw full canvas background**
|
||
|
||
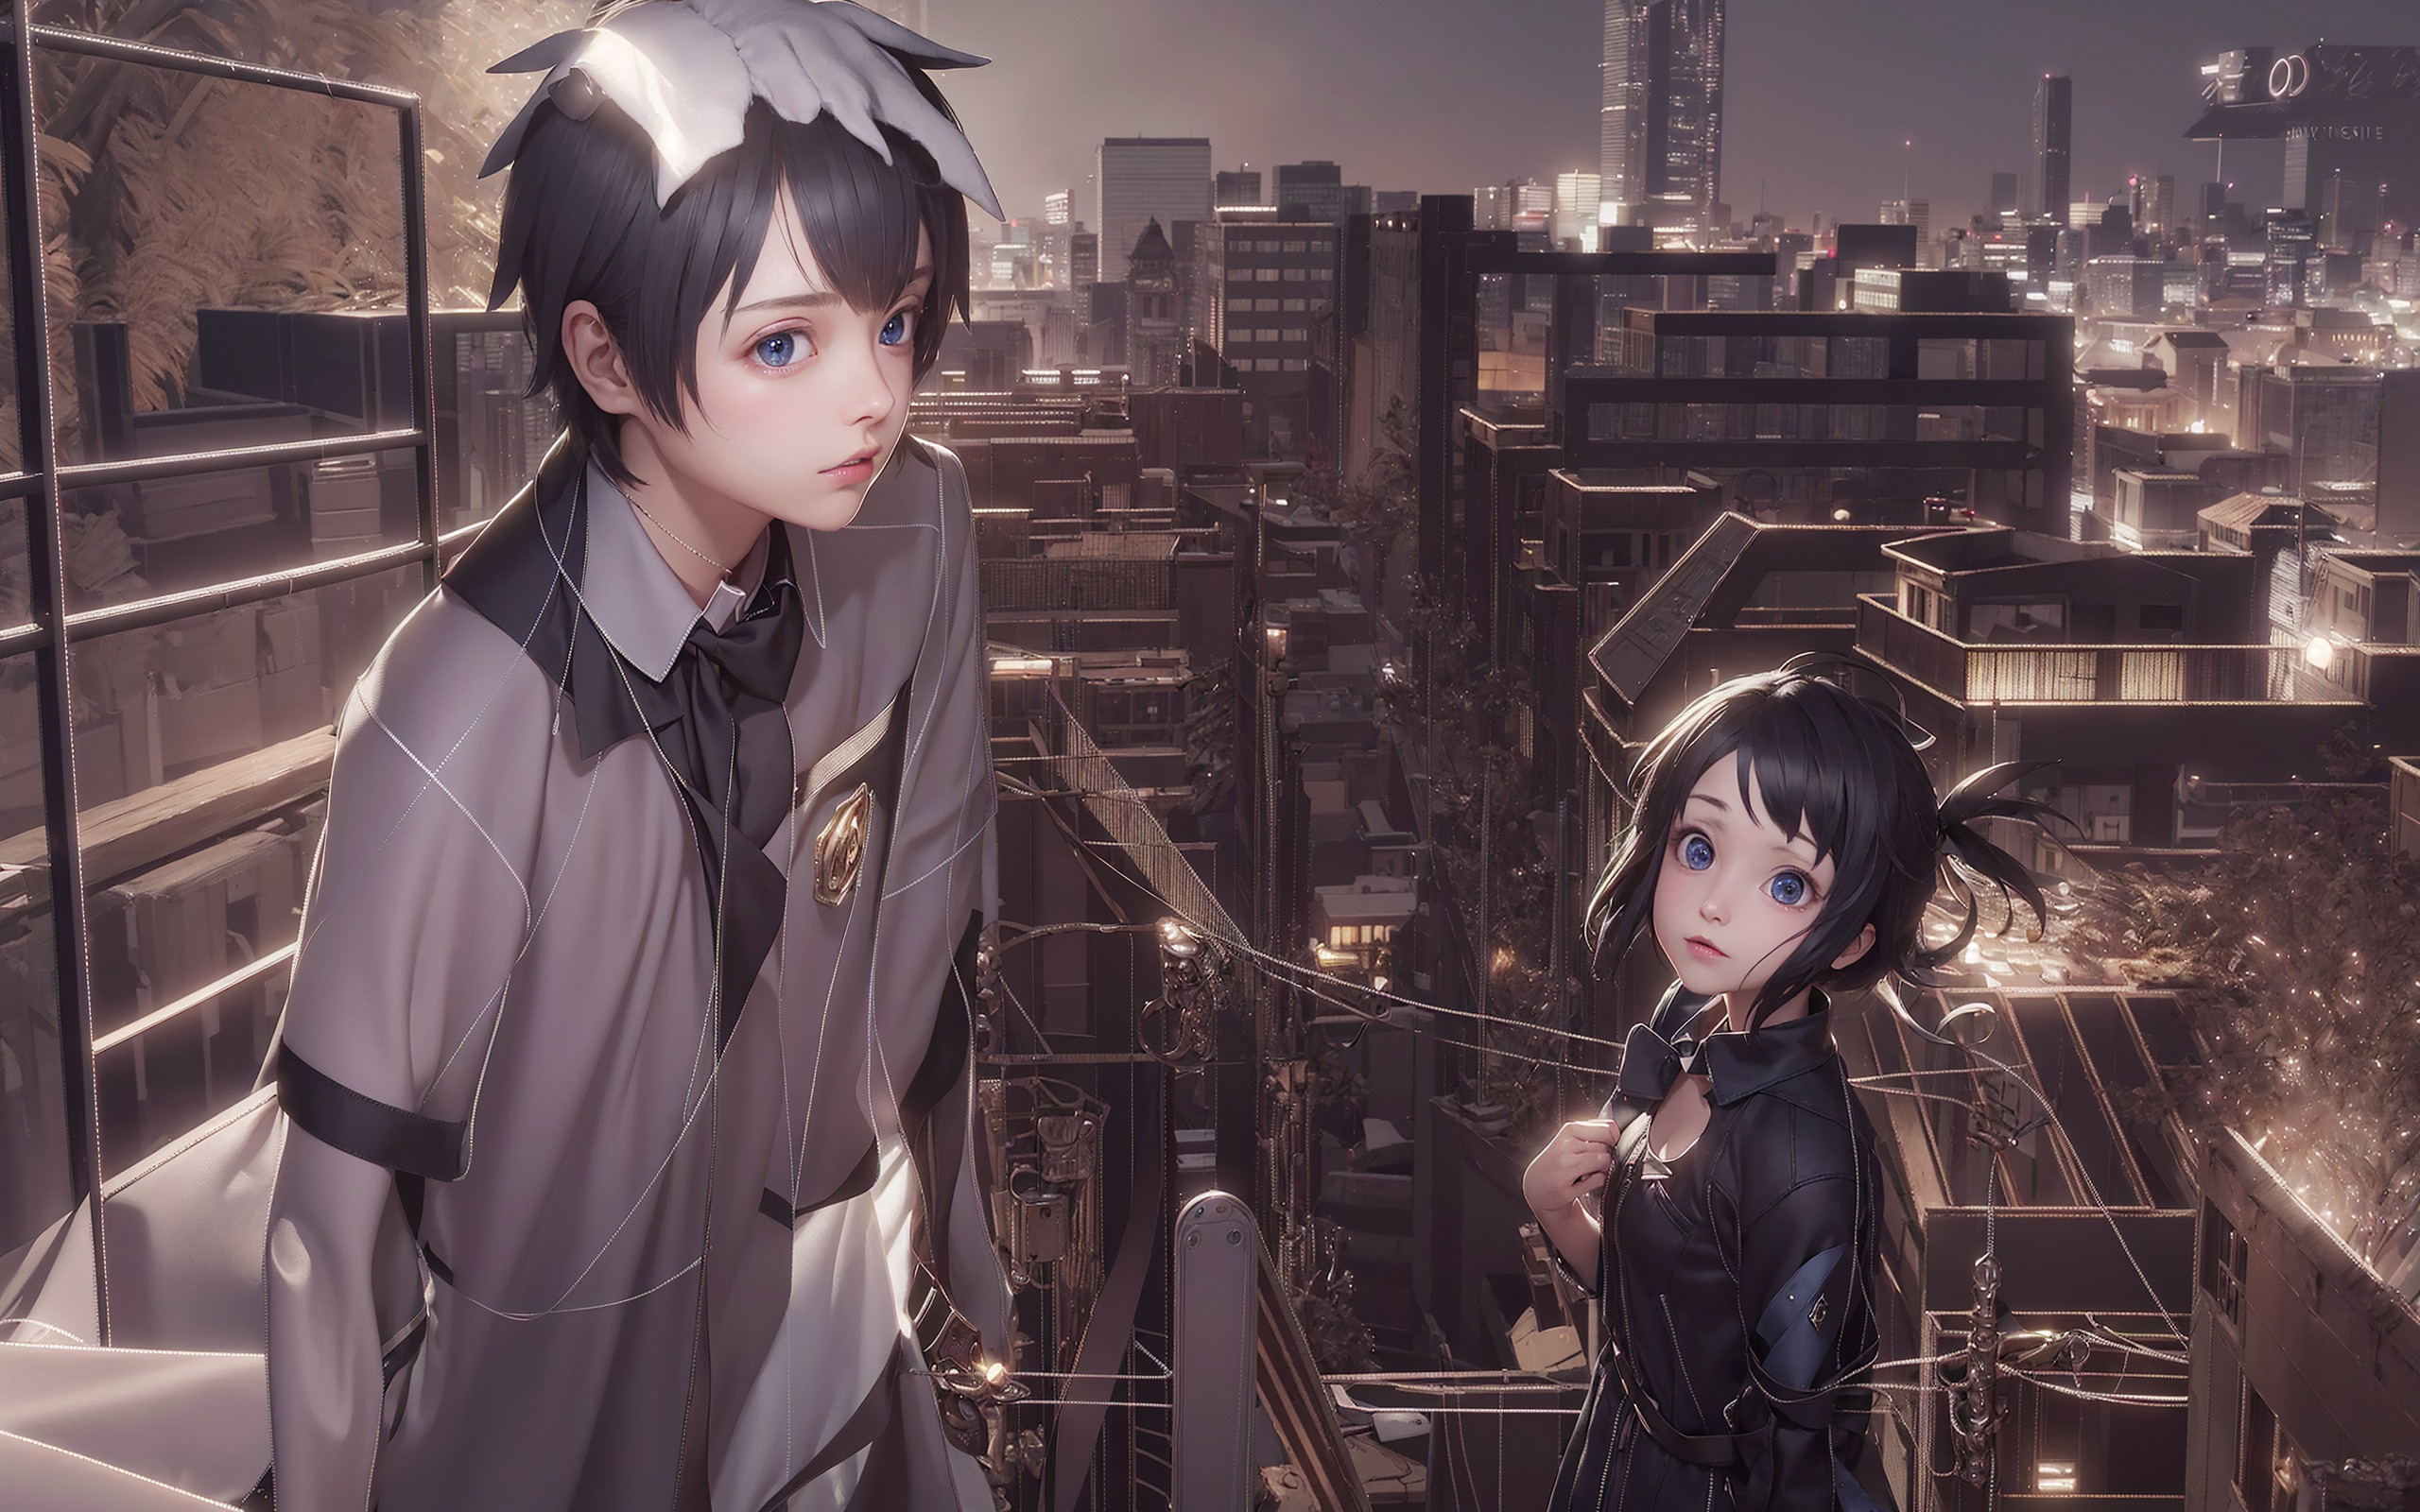
#### Example 1: masterpiece, best quality, highres, city skyline, night.
|
||
|
||

|
||
|
||
#### Example 2: cooperate with ControlNet to convert ancient wide paintings
|
||
|
||
- 22020 x 1080 ultra-wide image conversion
|
||
- Masterpiece, best quality, highres, ultra-detailed 8k unity wallpaper, bird's-eye view, trees, ancient architectures, stones, farms, crowd, pedestrians
|
||
- Before: [click for the raw image](https://github.com/pkuliyi2015/multidiffusion-img-demo/blob/master/ancient_city_origin.jpeg)
|
||
- 
|
||
- After: [click for the raw image](https://github.com/pkuliyi2015/multidiffusion-img-demo/blob/master/ancient_city.jpeg)
|
||
- 
|
||
|
||
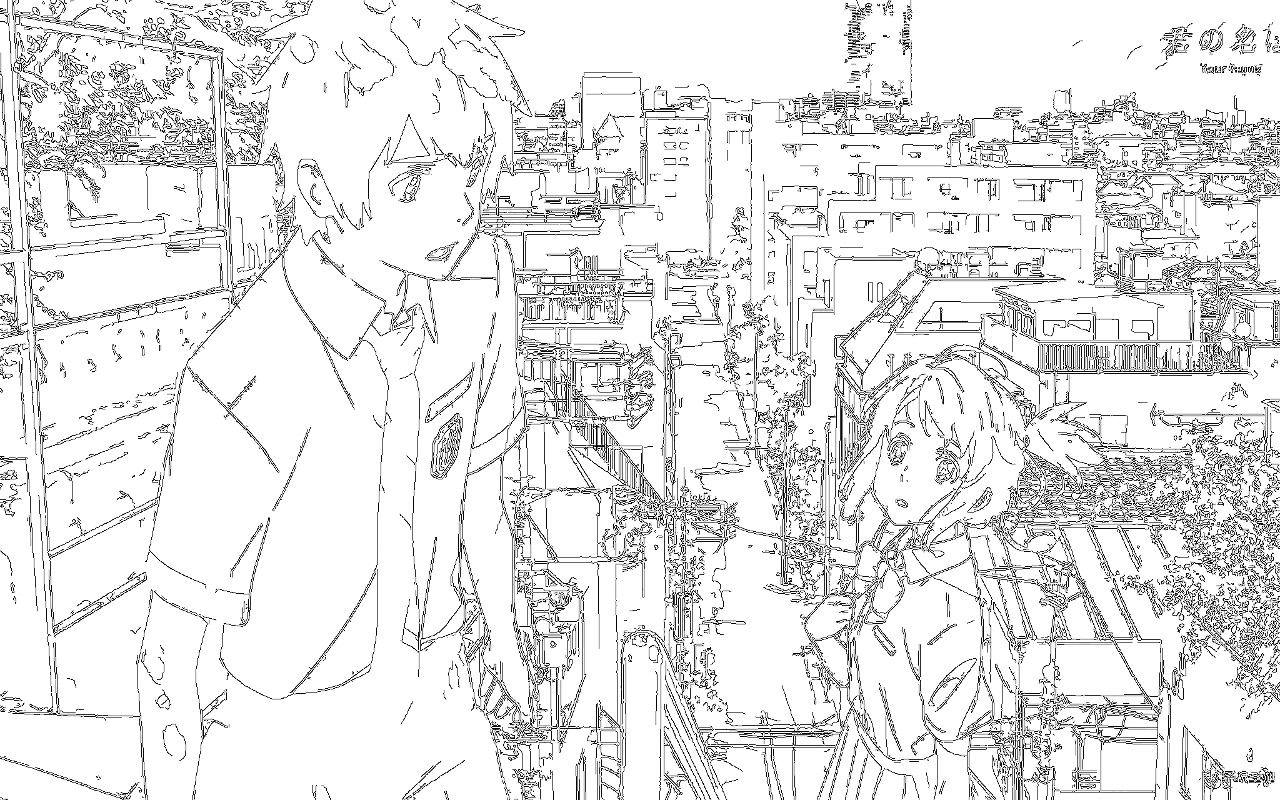
#### Example 3: 2560 * 1280 large image drawing
|
||
|
||
- ControlNet (canny edge)
|
||
|
||
|
||
|
||
|
||
****
|
||
|
||
## Installation
|
||
|
||
⚪ Method 1: Official Market
|
||
|
||
- Open Automatic1111 WebUI -> Click Tab "Extensions" -> Click Tab "Available" -> Find "[MultiDiffusion with Tiled VAE]" -> Click "Install"
|
||
|
||
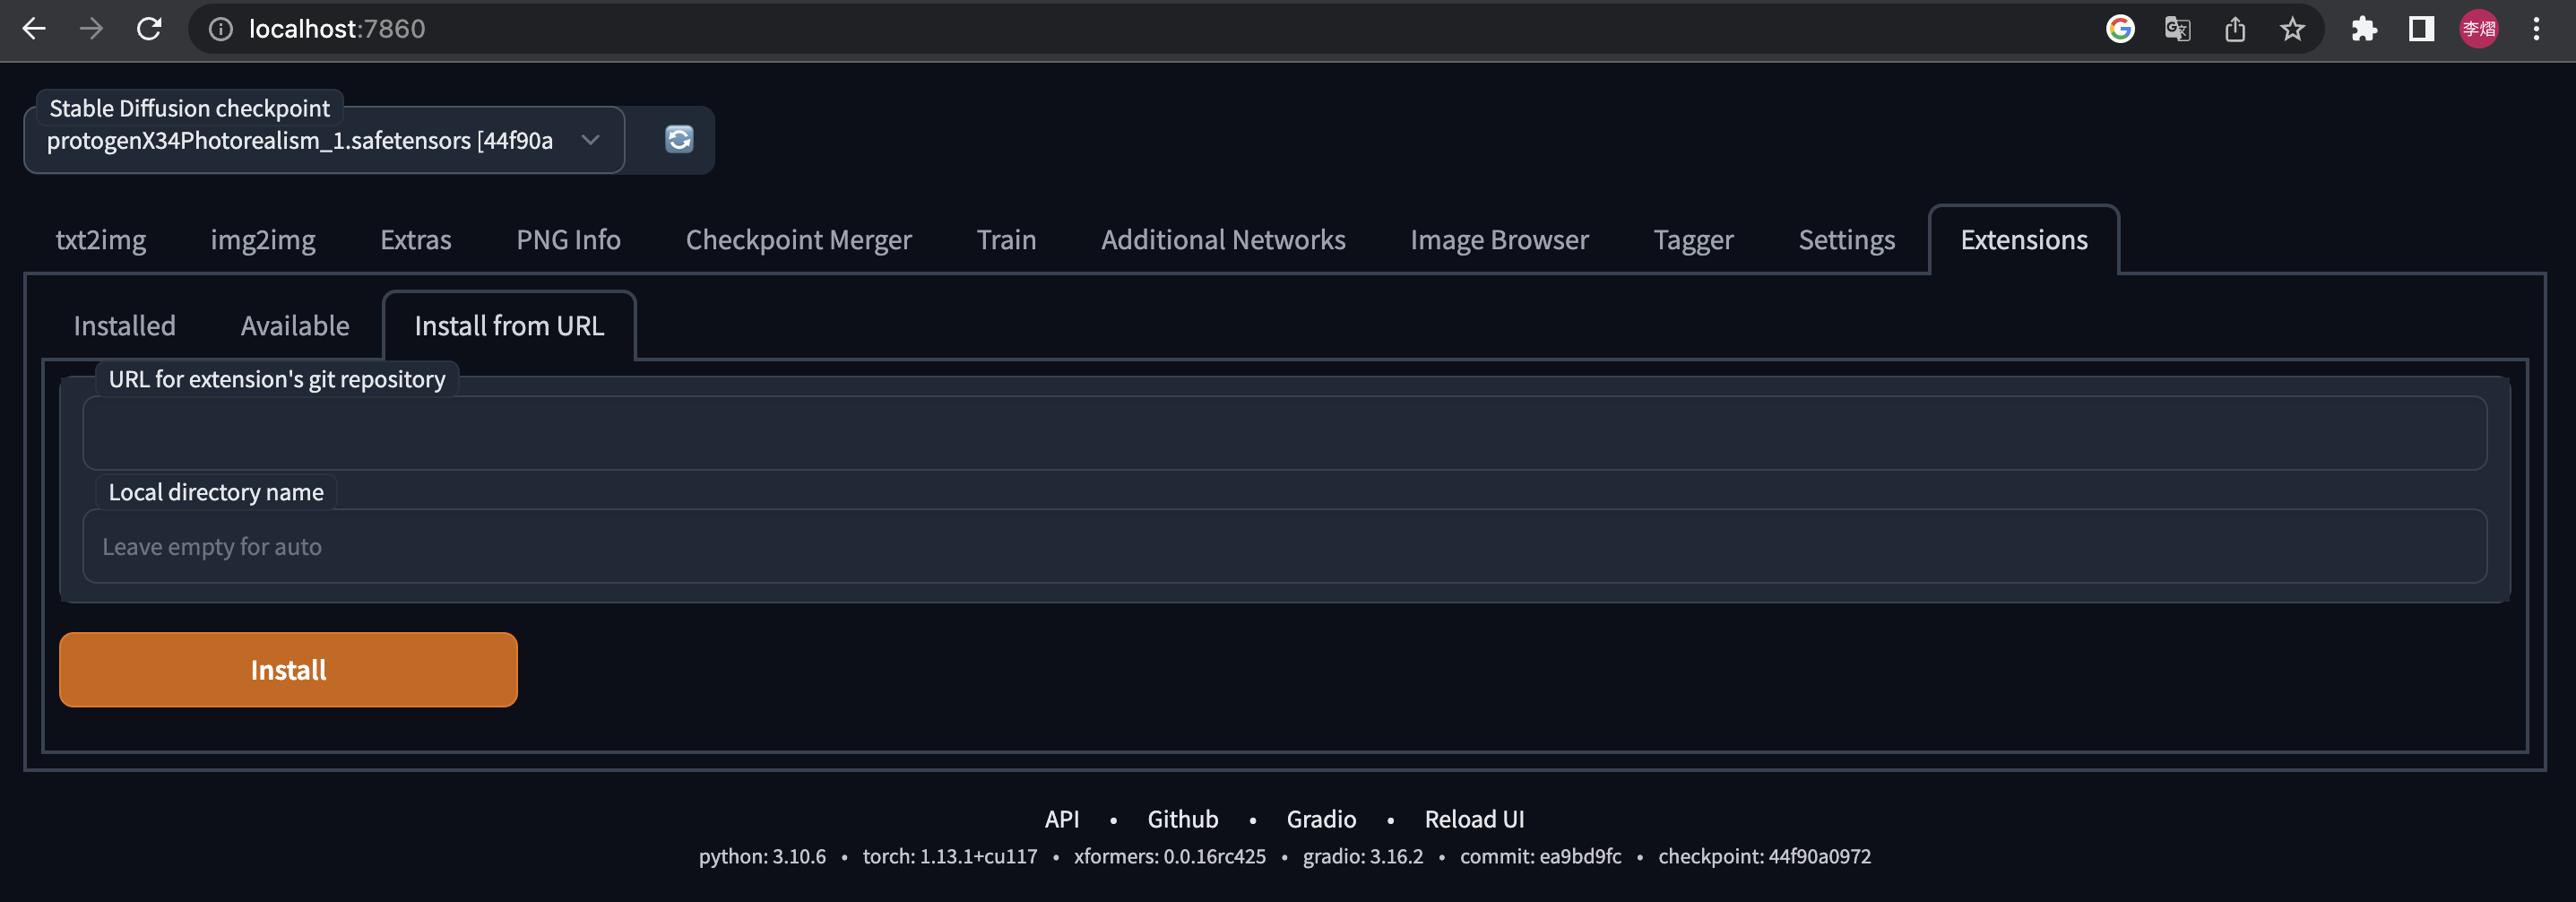
⚪ Method 2: URL Install
|
||
|
||
- Open Automatic1111 WebUI -> Click Tab "Extensions" -> Click Tab "Install from URL" -> type in https://github.com/pkuliyi2015/multidiffusion-upscaler-for-automatic1111.git -> Click "Install"
|
||
|
||
|
||
|
||
****
|
||
|
||
## Usage
|
||
|
||
### Tiled VAE
|
||
|
||
|
||
|
||
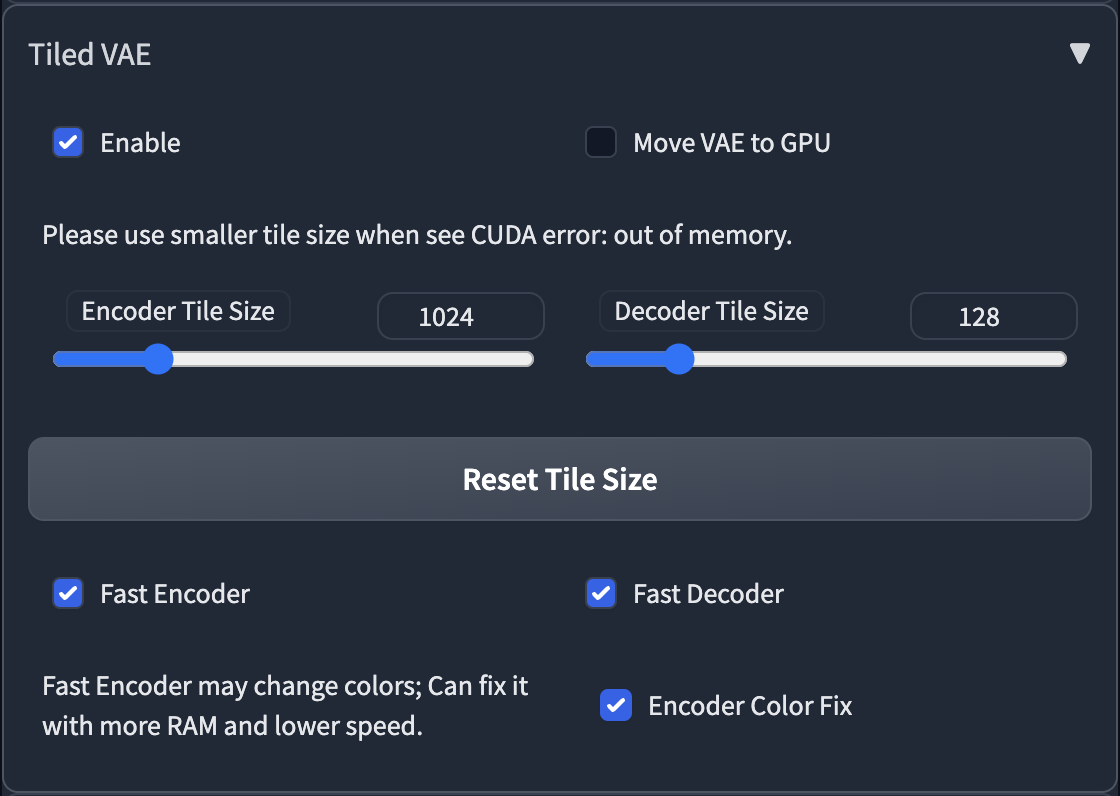
- The script will recommend settings for you when first use.
|
||
- So normally, you don't need to change the default params.
|
||
- You only need to change params in the following cases
|
||
1. When you see CUDA out of memory error before generation, or after generation, please low down the tile size.
|
||
2. If you use too small a tile size and the picture becomes gray and unclear, please enable Encoder Color Fix.
|
||
|
||
****
|
||
|
||
### Tiled Diffusion
|
||
|
||

|
||
|
||
|
||
|
||
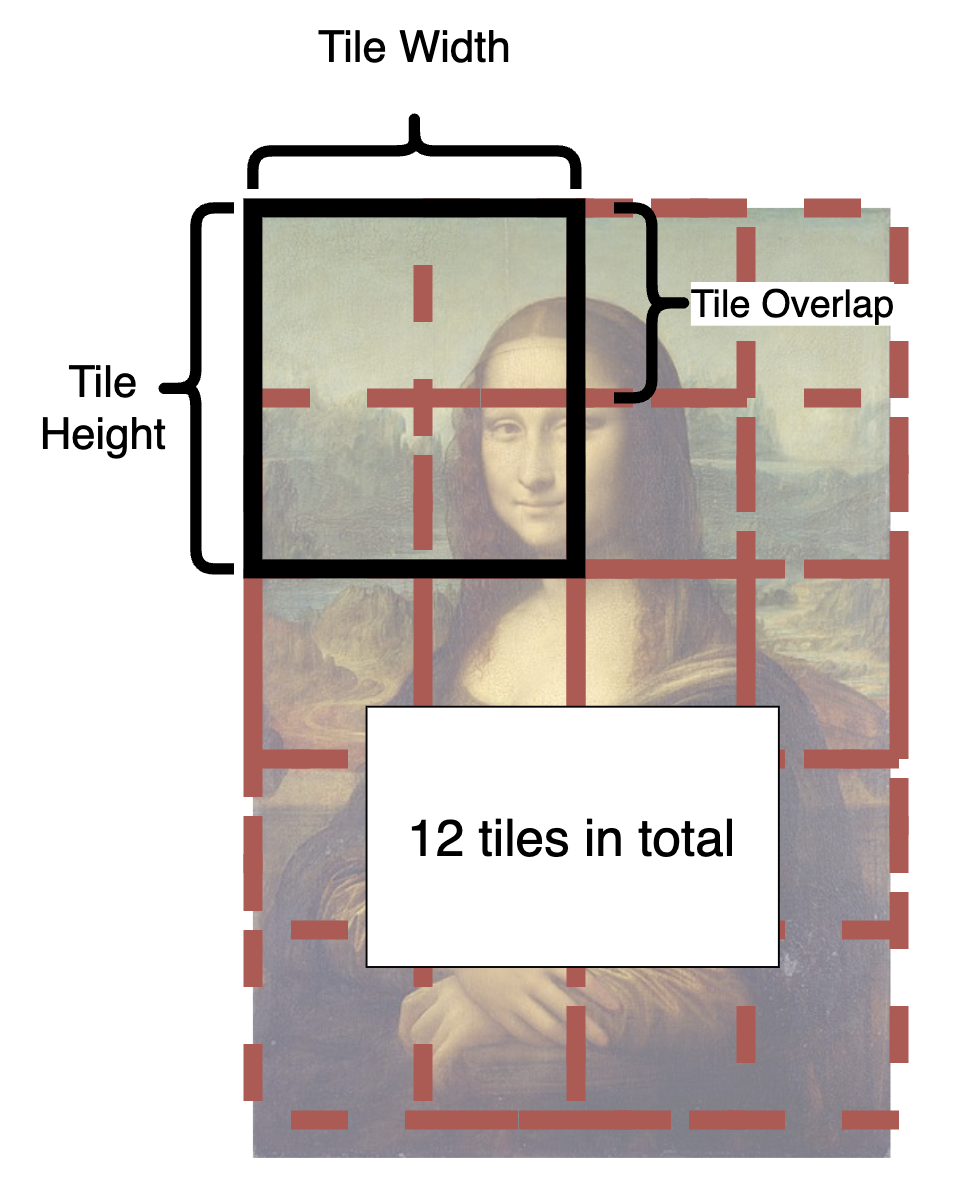
- From the illustration, you can see how is an image split into tiles.
|
||
- In each step, each tile in the latent space will be sent to Stable Diffusion UNet.
|
||
- The tiles are split and fused over and over again until all steps are completed.
|
||
- What is a good tile size?
|
||
- A larger tile size will increase the speed because it produces fewer tiles.
|
||
- However, the optimal size depends on your checkpoint. The basic SD1.4 is only good at drawing 512 * 512 images (SD2.1 will be 768 * 768). And most checkpoints cannot generate good pictures larger than 1280 * 1280. So in latent space let's divide this by 8, and you will get 64 - 160.
|
||
- Hence, you should pick a value between 64 - 160.
|
||
- **Personally, I recommend 96 or 128 for fast speed.**
|
||
- What is a good overlap?
|
||
- The overlap reduces seams in fusion. Obviously, a larger overlap means fewer seams, but will **significantly reduce the speed** as it brings much more tiles to redraw.
|
||
- Compared to MultiDiffusion, Mixture of Diffusers requires less overlap because it uses Gaussian smoothing (and therefore can be faster).
|
||
- **Personally, I recommend 32 or 48 for MultiDiffusion, 16 or 32 for Mixture of Diffusers**
|
||
- **Upscaler** will appear in i2i. You can select one to upscale your image in advance.
|
||
|
||
****
|
||
|
||
### Region Prompt Control
|
||
|
||
ℹ Normally, all tiles share the same main prompt. So you can't draw meaningful objects with the main prompt, it will draw your object everywhere and ruin your image.
|
||
ℹ To handle this, we provide the powerful region prompt control tool.
|
||
|
||

|
||
|
||
1. First, enable the region prompt control.
|
||
- **NOTE: When you enable the control, the default tiling behavior will be disabled.**
|
||
- If your custom regions can't fill the whole canvas, it will produce brown color (MultiDiffusion) or noises (Mixture of Diffusers) in those uncovered areas.
|
||
- We recommend you use your own regions to fill the canvas, as it can be much faster when generation.
|
||
- If you are lazy to draw, you can also enable the **Draw full canvas background.** However, this will be much slower when generation.
|
||
2. Upload an image or click the button to create an empty image as a reference.
|
||
3. Click the enable in Region 1, you will see a red rectangle appears in the image.
|
||
- **Click and drag** the region with your mouse to move and resize them.
|
||
4. Select region type. If you want to draw objects, select Foreground. Otherwise select Background.
|
||
- **Feather** will appear if you select foreground.
|
||
- The larger value will give you more smooth edges.
|
||
5. Type in your prompt and negative prompt for the region.
|
||
- **Note: your prompt will be appended to the prompt at the top of the page.**
|
||
- You can leverage this to save your words, i.e., write common things like "masterpiece, best quality, highres..." and use embedding like EasyNegative at the top of the page.
|
||
- **You can also use Textual Inversion and LoRA in the prompt**
|
||
|
||
****
|
||
|
||
### Special tips for Upscaling
|
||
|
||
- **Recommend Parameters for Efficient Upscaling.**
|
||
- Sampler = Euler a, steps = 20, denoise = 0.35, method = Mixture of Diffusers, Latent tile height & width = 128, overlap = 16, tile batch size = 8 (reduce tile batch size if see CUDA out of memory).
|
||
- We are compatible with masked inpainting
|
||
- If you want to keep some parts, or the Tiled Diffusion gives you weird results, just mask these areas.
|
||
- **The checkpoint is crucial.**
|
||
- MultiDiffusion works very similar to highres.fix, so it highly relies on your checkpoint.
|
||
- A checkpoint that is good at drawing details can add amazing details to your image.
|
||
- A **full checkpoint** instead of a pruned one can yield much finer results.
|
||
- **Don't include any concrete objects in your main prompts,** otherwise, the results get ruined.
|
||
- Just use something like "highres, masterpiece, best quality, ultra-detailed 8k wallpaper, extremely clear".
|
||
- And use regional prompt control for concrete objects if you like.
|
||
- You don't need too large tile size, large overlap and many denoising steps, **or it can be very slow**.
|
||
- **CFG scale can significantly affect the details.**
|
||
- A large CFG scale (e.g., 14) gives you much more details.
|
||
- You can control how much you want to change the original image with **denoising strength from 0.1 - 0.6**.
|
||
- If your results are still not as satisfying as mine, [see our discussions here.](https://github.com/pkuliyi2015/multidiffusion-upscaler-for-automatic1111/issues/3)
|
||
|
||
****
|
||
|
||
## License
|
||
|
||
This work is licensed under a [Creative Commons Attribution-NonCommercial-ShareAlike 4.0 International License][cc-by-nc-sa].
|
||
|
||
[![CC BY-NC-SA 4.0][cc-by-nc-sa-image]][cc-by-nc-sa]
|
||
|
||
[cc-by-nc-sa]: http://creativecommons.org/licenses/by-nc-sa/4.0/
|
||
[cc-by-nc-sa-image]: https://licensebuttons.net/l/by-nc-sa/4.0/88x31.png
|
||
[cc-by-nc-sa-shield]: https://img.shields.io/badge/License-CC%20BY--NC--SA%204.0-lightgrey.svg
|
||
|
||
****
|
||
|
||
Thanks for reading!
|